

Imagine your home glowing and cozy on Christmas morning. Now picture making that magic yourself with only paper. I love this idea because it feels simple and sweet.
You do not need fancy tools or a big budget. These paper Christmas decorations are quick to make and kind to your wallet.
Grab scissors, glue, and a warm drink. Let me show you how easy paper Christmas decorations can be. Ready to start now?
Cute Paper Tree Christmas Decorations to Hang
Start with paper Christmas decorations for your tree. They are light and cheap and look lovely with tiny twinkle lights.
1. Paper Straw Star Ornaments
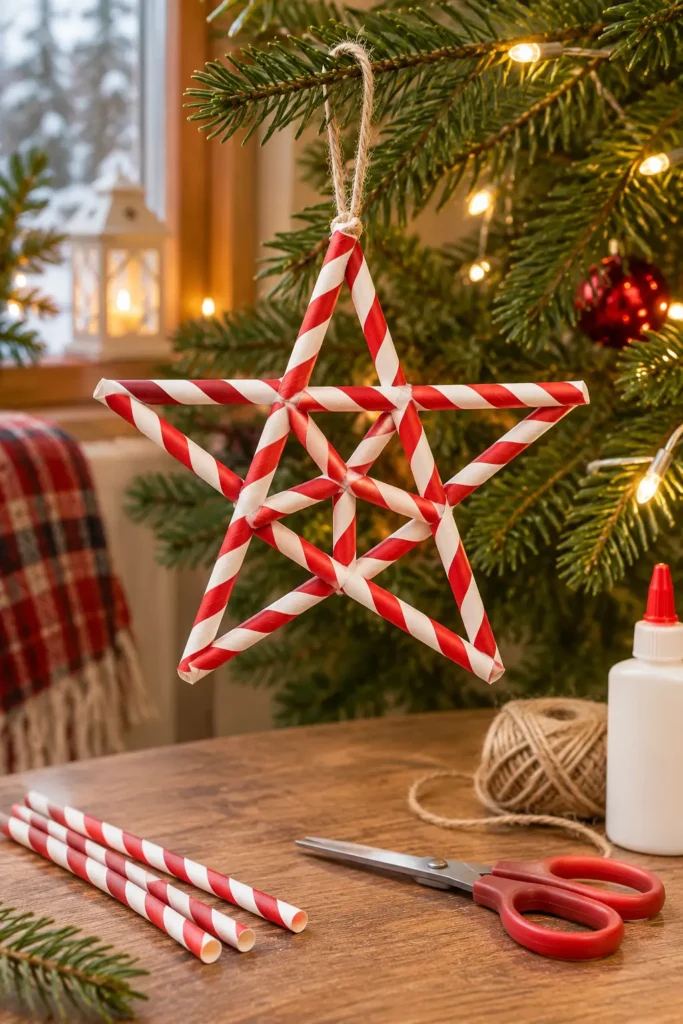
Paper straws are not just for drinks. I use them to make tiny stars that look so neat on a tree. Choose red and white straws or plain gold ones.
Each star has five points and needs only a little glue. Cut the straws to the same length so the star sits flat. Add a thin string at the top, and your star is ready to hang.
Materials Needed:
- Five paper straws
- Scissors
- Craft glue
- Small clothespins
- Thin string
How to Make It:
- Cut five straws to the same length.
- Lay them out in a star shape so each straw crosses two others.
- Add a dot of glue at every crossing.
- Hold each joint with a clothespin until it dries.
- Tie a thin string to one point.
2. Mini Origami Gift Boxes

Tiny gift boxes look sweet on a tree, and they are fun to fold. These paper Christmas decorations need only square paper and no glue at all.
Pick bright wrapping paper or old cards. The box holds a small candy or a note. Fold slowly and press every crease with your thumb.
Tie a thin ribbon around each box so it looks like a real present.
Materials Needed:
- Square wrapping paper
- Thin ribbon
- Small candy or a short note
How to Make It:
- Cut a square of paper about six inches wide.
- Fold each corner to the center point.
- Fold two opposite edges to the center line and open them.
- Fold the other two edges to the center line and keep them folded.
- Lift the open sides and fold the end flaps inside to form walls.
- Fill the box and tie ribbon around it.
3. Quilled Mini Wreaths

Quilling sounds fancy, but it only means rolling thin paper strips. A mini wreath made this way looks great as a gift topper or a tree ornament.
Use green strips for the leaves and a tiny red one for a berry. Roll each strip around a toothpick and let it loosen a little. Glue the rolls in a circle, and they hold together nicely.
Materials Needed:
- Green quilling strips
- One red paper strip
- Toothpick
- Craft glue
- Thin ribbon
How to Make It:
- Roll a green strip around the toothpick.
- Let it loosen and glue the end.
- Pinch it into a leaf shape.
- Make about ten leaves.
- Glue the leaves side by side in a ring.
- Roll the red strip tight for a berry and glue it on.
- Glue a thin ribbon loop at the back.
4. Tiny Paper Mittens

Mittens are the cutest cozy symbol of winter. Cut two mitten shapes from patterned paper and glue the edges together.
Leave the cuff end open so you can slip in a tiny treat or a note. I like to add a strip of white paper at the cuff to look like fluffy wool.
Punch a hole near the cuff and tie a loop of yarn.
Materials Needed:
- Patterned paper
- Plain card paper
- White paper
- Pencil and scissors
- Craft glue
- Hole punch
- Yarn
How to Make It:
- Draw a mitten on card paper and cut it out as a guide.
- Trace it twice on patterned paper and cut both.
- Glue the sides together and leave the cuff end open.
- Glue a white paper strip across the cuff.
- Punch a hole near the cuff.
- Tie a loop of yarn through the hole.
Pretty Garland Ideas and Mantel Paper Christmas Decorations
These paper Christmas decorations dress up your mantel, walls, and stairs with color and cozy charm in just minutes.
5. Pastel Paper Bunting Banner

A bunting banner is the fastest way to add color to a wall. These paper Christmas decorations feel fresh when you use pastel pink, mint, and cream.
Cut one triangle from cardboard to use as your guide. Trace it many times on colored paper. Then fold the top edge over a string and glue it.
Hang it above your sofa or across a window.
Materials Needed:
- Cardboard
- Pastel paper
- Pencil
- Scissors
- Long string
- Craft glue
How to Make It:
- Cut one triangle from cardboard as a guide.
- Trace about twenty triangles on pastel paper.
- Cut them all out.
- Fold the top edge of each triangle over the string and glue it.
- Space the triangles evenly.
- Hang the banner with removable hooks.
6. Tissue Pom Pom Garland
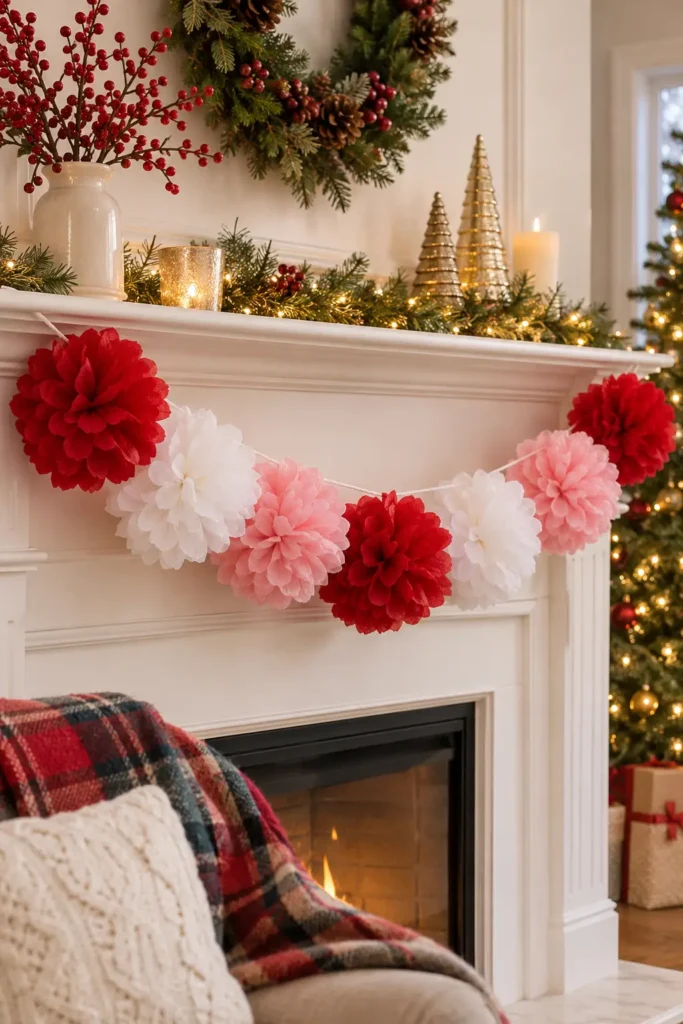
Fluffy pom poms make a room feel soft and happy. Stack six sheets of tissue paper and fold them like a fan.
Tie a string around the middle and trim both ends round. Then fluff each layer upward one by one.
Be gentle so the tissue does not tear. Make five in red and white and tie them on a long cord about a foot apart.
Materials Needed:
- Tissue paper sheets
- Scissors
- String
- Long cord
- Ruler
How to Make It:
- Stack six sheets of tissue paper.
- Fold the stack like a fan with folds one inch wide.
- Tie string around the middle.
- Trim both ends round.
- Fluff each layer up and apart gently.
- Tie five pom poms on a long cord about a foot apart.
🎄 Want Your Home to Look Christmas-Ready Without the Extra Fuss?
7. Gingerbread Man Paper Chain

Everyone loves a gingerbread friend. This is one of my favorite paper Christmas decorations because one cut makes a whole row of little men.
Fold brown paper like a fan. Draw one gingerbread man with his hands touching the folded edges.
Cut around the shape and keep the hands attached. Open the fan, and you have a happy chain ready to hang.
Here is the best brown paper under budget: Check this out
Materials Needed:
- Long brown paper strip
- Pencil
- Scissors
- White gel pen
- Red ribbon
How to Make It:
- Cut a long strip of brown paper.
- Fold it like a fan into five parts.
- Draw one gingerbread man with hands touching both side edges.
- Cut out the shape,e but do not cut the hands.
- Open the chain and draw faces with a white pen.
- Tie a red ribbon at each end for hanging.
8. Paper Fan Mantel Swag
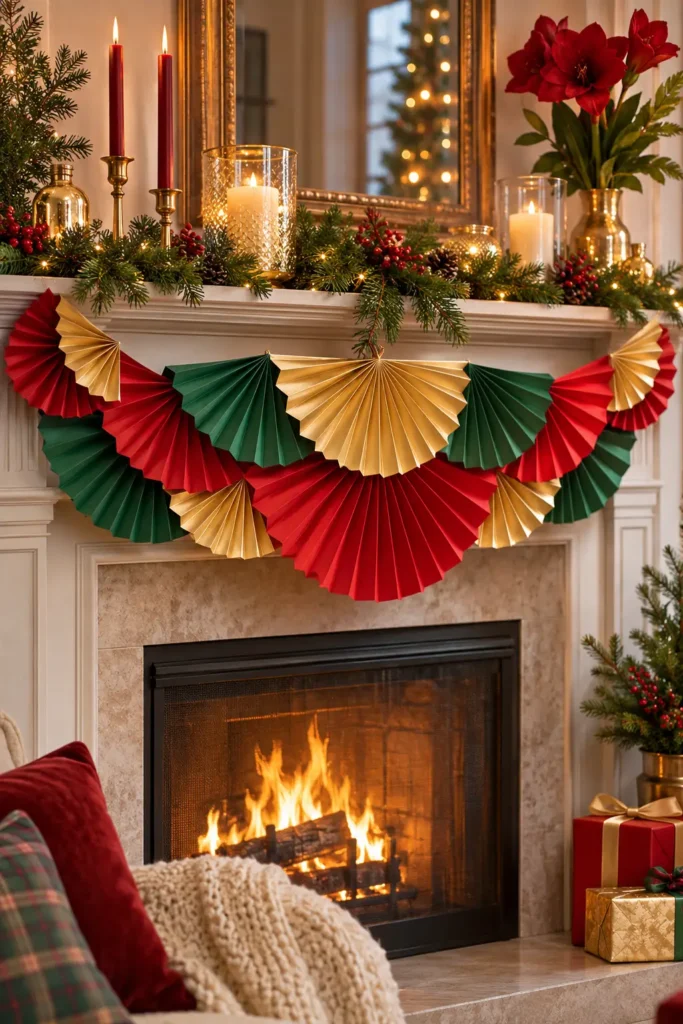
Paper fans bring a rich party look to any mantel. Fold wrapping paper into a fan shape and tape the center. Mix red, green, and gold fans in two sizes.
I like to put a small fan on top of a large one. Then tape them in a swoop along the mantel edge so they overlap and look rich and full.
Materials Needed:
- Wrapping paper sheets
- Ruler
- Scissors
- Double-sided tape
- Painters tape
How to Make It:
- Cut paper strips about eight inches wide.
- Fold each strip into a tight accordion.
- Pinch the middle and tape it.
- Open the fan and tape the two edges together.
- Place a small fan on top of a large one.
- Tape the fans along the mantel in a gentle curve.
Festive Table Decor and Gift Wrap Paper Christmas Decorations
Now let us dress your table and your gifts. These small touches make your dinner and presents feel extra special.
9. Paper Napkin Rings
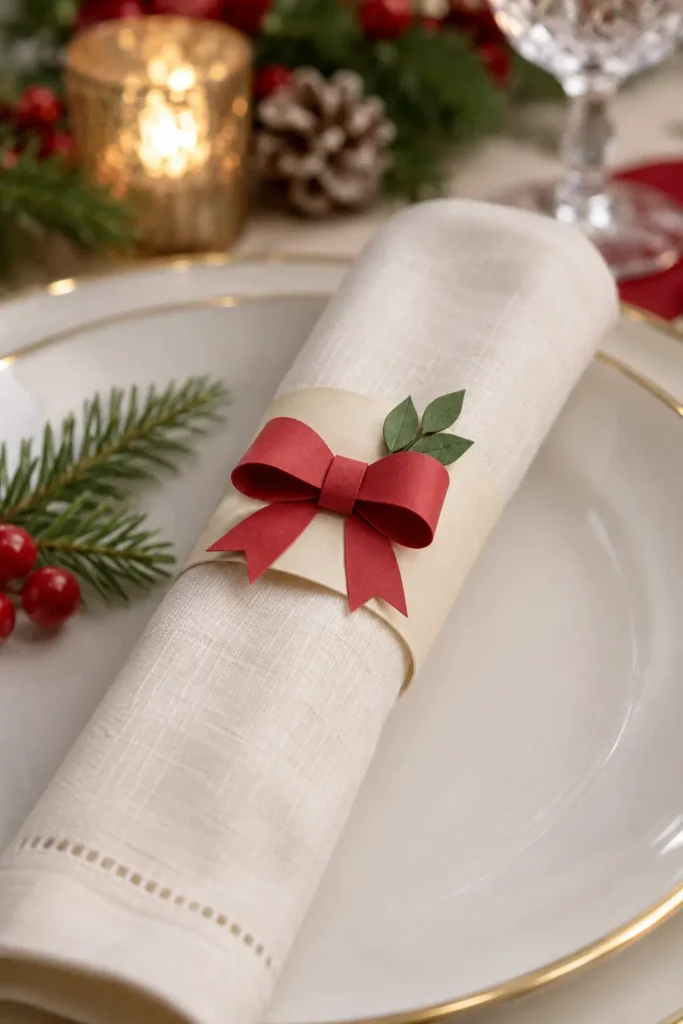
A napkin ring turns a plain napkin into a gift. These paper Christmas decorations are easy and look rich at dinner.
Cut a strip of cardstock and curl it into a ring. Wrap a thin red paper strip around the front to make a bow shape.
A small paper leaf tucked under the bow adds a fresh touch. Make one for every seat.
Materials Needed:
- Cream cardstock
- Thin red paper
- Green paper
- Craft glue
- Scissors
- Ruler
How to Make It:
- Cut a cardstock strip two inches wide and six inches long.
- Glue the ends to make a ring.
- Fold a thin red strip into a bow shape.
- Glue the bow on the ring.
- Cut a tiny green leaf and tuck it under the bow.
10. Mini Tree Place Cards
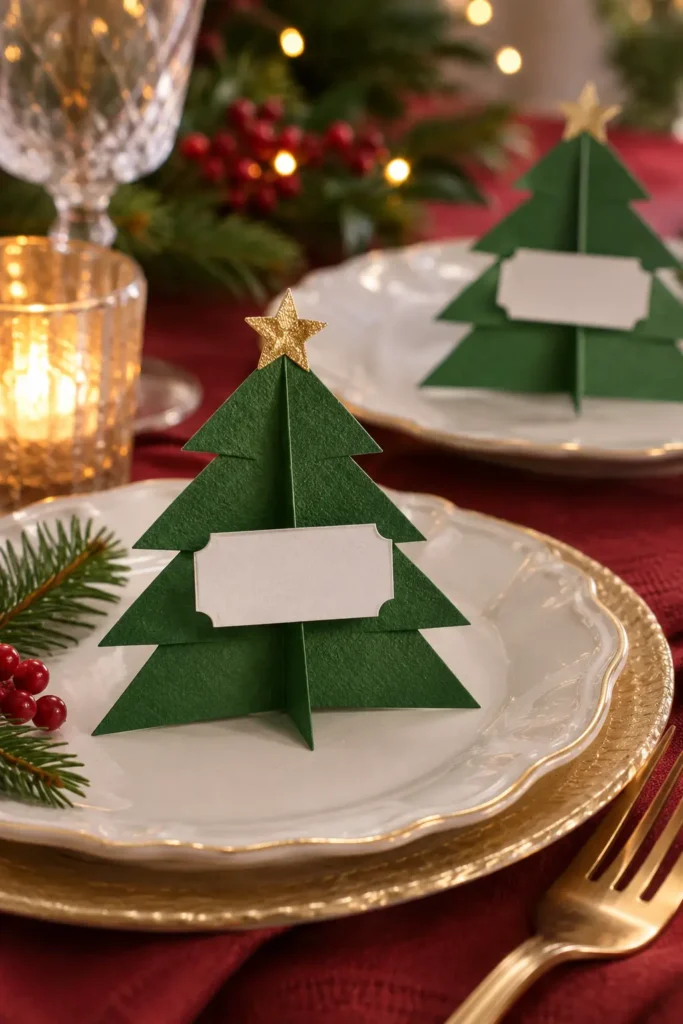
Place cards make every guest feel welcome. Fold a rectangle of green card paper into a tent so it stands on the table.
Cut small scallops along the front edge to look like tree branches. Write a name on a white label and stick it in the middle.
Add a tiny gold star at the top. Set one on every plate.
Materials Needed:
- Green card paper
- White labels
- Gold paper
- Pen
- Scissors
- Craft glue
How to Make It:
- Cut green card paper into a rectangle four inches by six inches.
- Fold it in half to make a tent.
- Cut small scallops along the front edge.
- Write a name on a white label.
- Stick the label in the middle.
- Glue a tiny gold star at the top.
11. Surprise Christmas Crackers
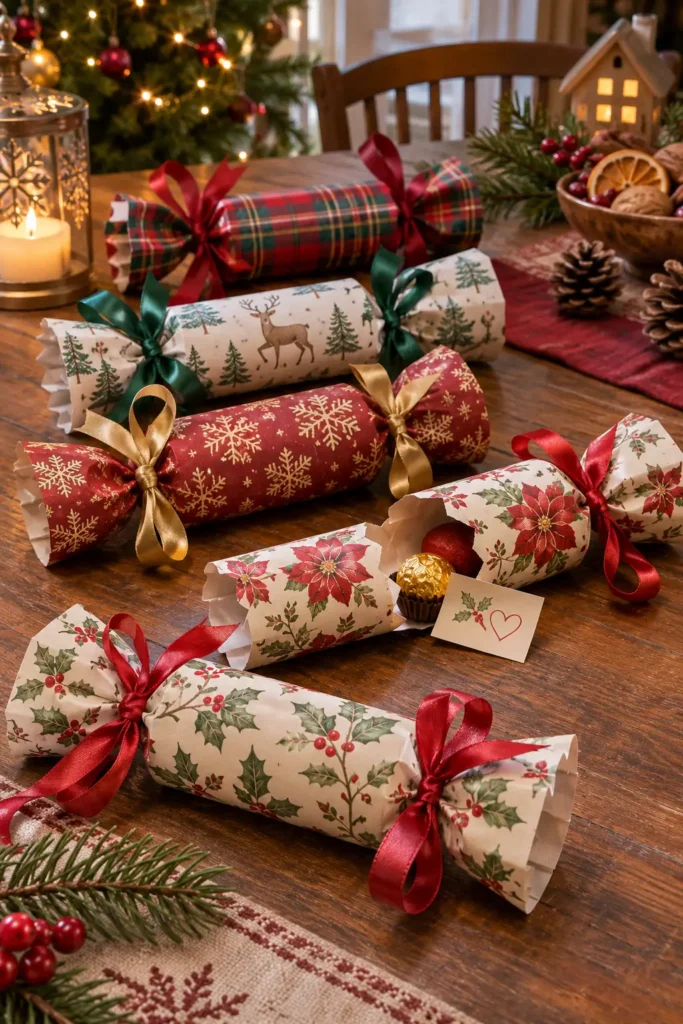
Christmas crackers are the star of the table, and you can make your own. Use a cardboard tube from toilet paper and wrap it in pretty paper.
Slide a small treat and a note inside. Tie both ends with ribbon so the cracker looks like a candy.
These paper Christmas decorations feel so special when guests open them together at dinner.
Materials Needed:
- Cardboard tubes
- Wrapping paper
- Double-sided tape
- Ribbon
- Small treats
- Handwritten notes
How to Make It:
- Cut wrapping paper three times as wide as the tube.
- Roll the paper around the tube and tape it.
- Tie ribbon around one end.
- Slide a treat and a note inside.
- Tie ribbon around the second end.
Here are the best gift wrapping papers that you can buy under the budget
As an affiliate, we may earn a commission from qualifying purchases.
12. Kraft Paper Gift Toppers
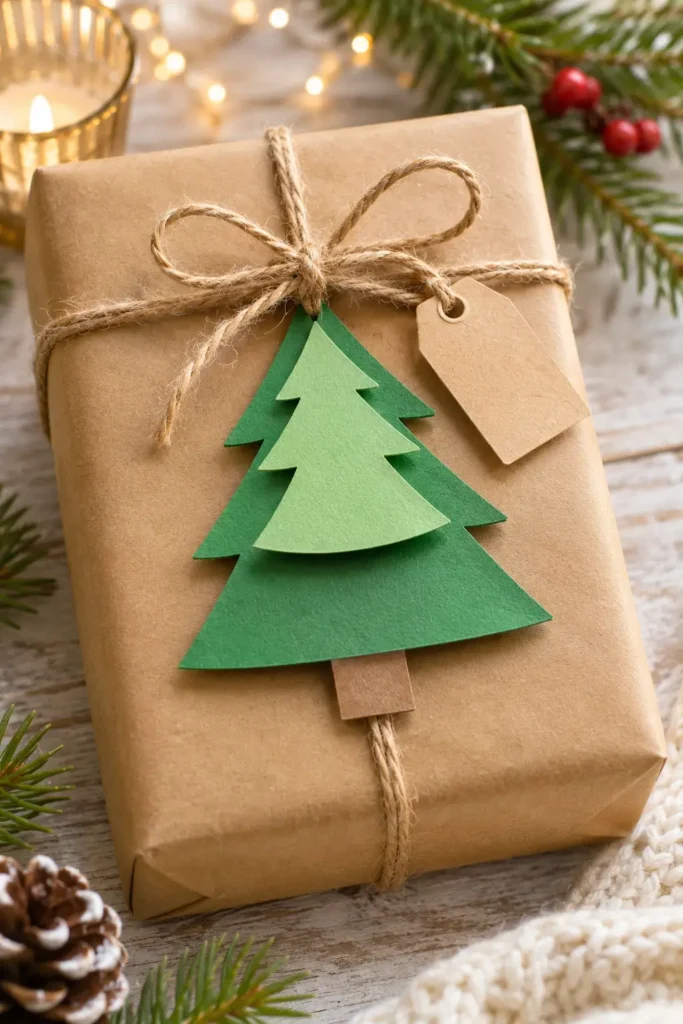
Plain brown paper looks so pretty when you add a little love. Cut three trees in different sizes from green paper. Stack them from big to small on the gift.
Stick them on with foam dots so they stand out. Write a name on a tiny paper tag and tie it with twine. Your gift looks like it came from a fancy shop but costs almost nothing.
Materials Needed:
- Brown kraft paper
- Green paper
- Foam dots
- Small paper tags
- Twine
- Scissors
How to Make It:
- Wrap the gift in brown paper.
- Cut three tree shapes in different sizes.
- Stack them from big to small.
- Stick the stack on the gift with foam dots.
- Write a name on a tag.
- Tie the tag on with twine.
Glowing Window Crafts and Paper Christmas Decorations with Lights
Here are paper Christmas decorations that catch the light and make your windows glow softly after the sun goes down.
13. Black Paper Window Silhouettes
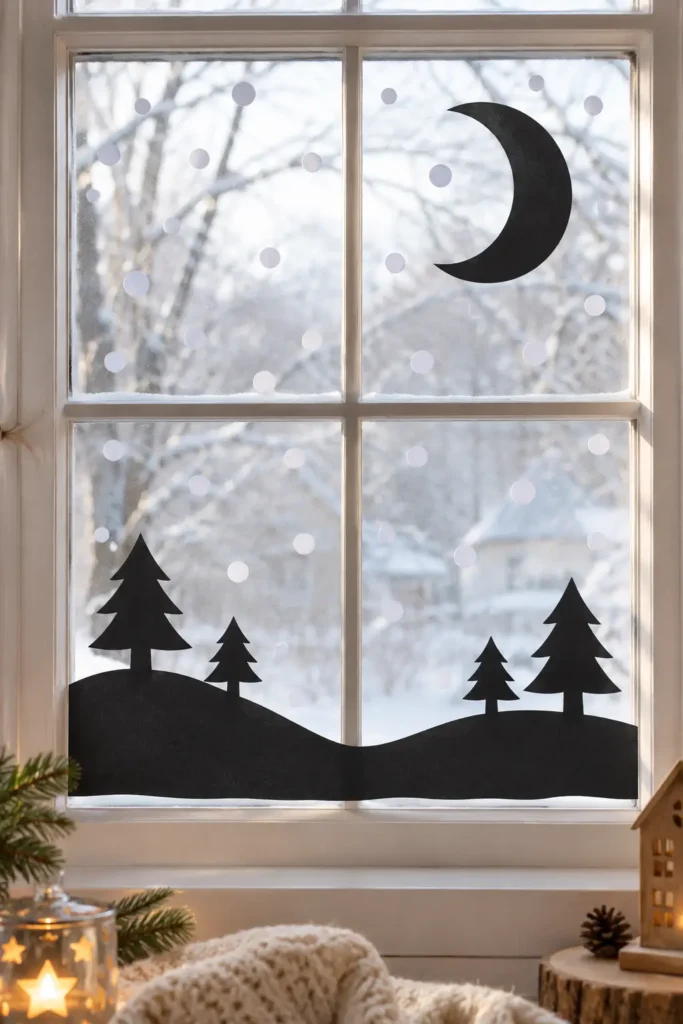
Silhouettes look like a winter story painted on glass. Draw a hill and a few tiny pine trees and a moon on black paper.
Cut them out carefully with small scissors. Stick the pieces on a window with a little removable tape.
Because the sky behind is bright, the shapes stand out sharp and clear. Add white paper dots for falling snow.
Here is the link to buy black paper under budget: Click here!
Materials Needed:
- Black paper
- White paper
- Pencil
- Small scissors
- Removable tape
How to Make It:
- Draw a hill, tiny pine trees, and a moon on black paper.
- Cut each shape out carefully.
- Tape the hill along the bottom of the window.
- Stick the trees on the hill and the moon in the sky.
- Cut white paper dots and add them for snow.
✨ Want a Christmas Home and Wedding That Guests Won’t Forget?
14. Stained Glass Tissue Panes
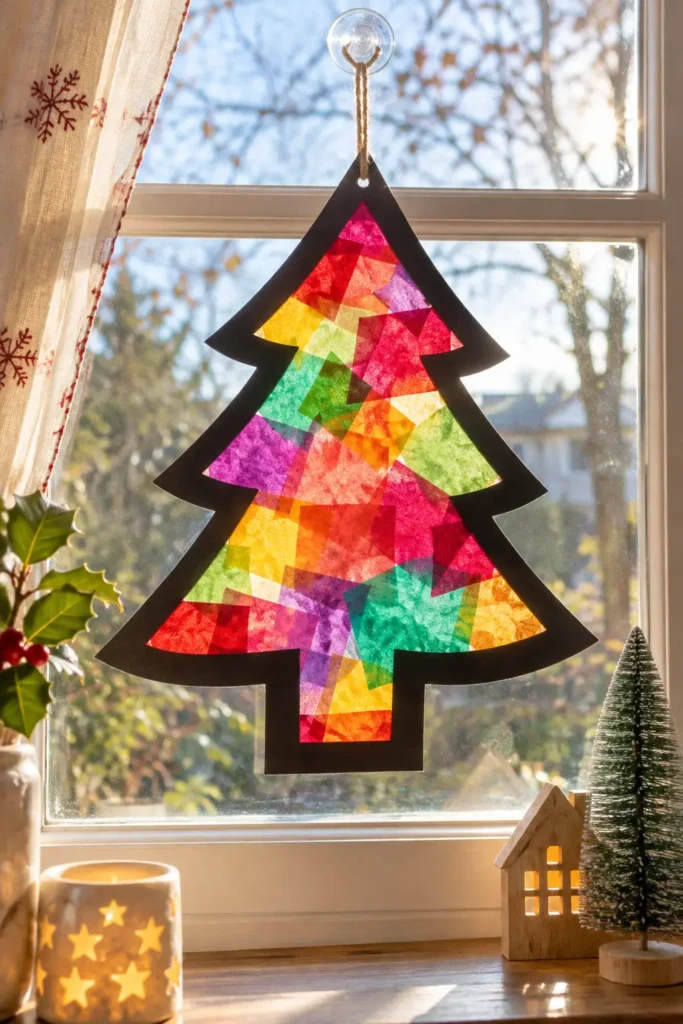
Tissue paper can look just like stained glass. These paper Christmas decorations glow when the morning sun comes through.
Cut a tree shape from a black paper frame. Stick clear sticky paper behind it. Press small squares of colorful tissue onto the sticky side.
Overlap the colors so they mix. Trim the edges and hang the pane on a window with tape.
Here is the best stained glass you can purchase under $2 : Click here!
Materials Needed:
- Black cardstock
- Clear sticky paper
- Colored tissue squares
- Scissors
- Tape
How to Make It:
- Draw a big tree on black cardstock.
- Poke scissors through the middle and cut out the tree to leave a frame.
- Stick clear sticky paper behind the opening.
- Press tissue squares onto the sticky side.
- Overlap the colors so they mix.
- Trim the edges and tape the pane to a window.
Also Check: How to clean frosted glass in just 10 minutes!
15. Paper Cup Light Shades
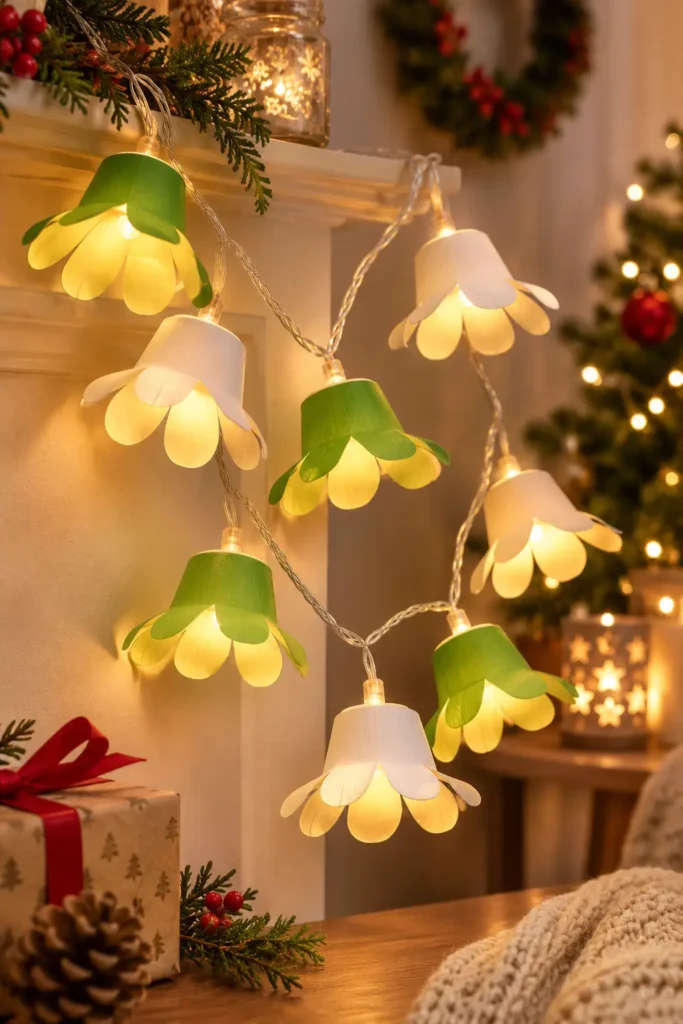
Plain white lights become flowers with paper cups. Cut each cup into thin petals from the rim and stop near the base.
Fold the petals outward and curl them with a pencil. Cut a small cross in the cup base and push one light bulb through it.
Use only battery-powered LED lights to stay safe. Mix cups in white and green for a snowy look.
Buy best paper cups here under $1: Check this out
Materials Needed:
- Small paper cups
- Scissors
- Pencil
- Battery LED string lights
How to Make It:
- Cut thin petals into each cup from the rim and stop near the base.
- Fold the petals outward.
- Curl them around a pencil.
- Cut a small cross in the base.
- Push one bulb through each cross.
- Space the cups evenly along the string.
16. Punched Paper Bag Luminaries
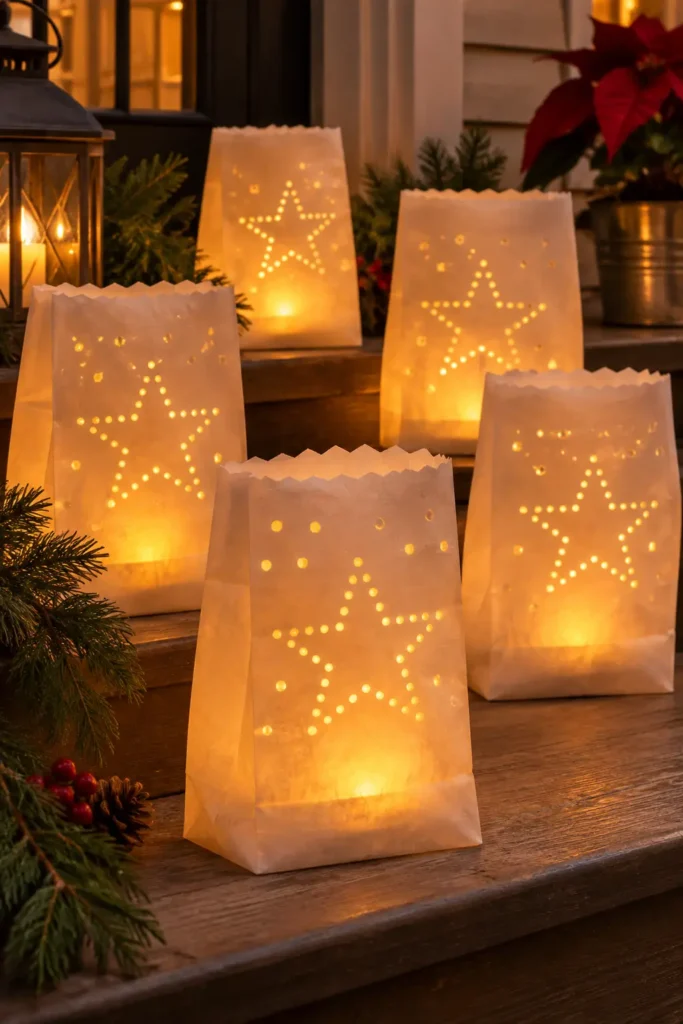
Paper bag luminaries make a porch or a table glow. Draw simple shapes like stars and dots on a white lunch bag with a pencil.
Poke along the lines with a pushpin on a folded towel. Fill the bottom with a little sand or rice to keep the bag steady.
Set a battery tea light inside. Never use a real candle with paper.
Here are budget friendly paper bags to try this decor: Check this out
Materials Needed:
- White paper lunch bags
- Pencil
- Pushpin
- Folded towel
- Sand or rice
- Battery LED tea lights
How to Make It:
- Draw a star pattern on the front of the bag.
- Lay the bag flat on a folded towel.
- Poke small holes along every line.
- Open the bag and fold the top edge down once.
- Add sand or rice to the bottom.
- Place a battery-powered tea light in the sand.
Family-Friendly Crafts and Keepsake Paper Christmas Decorations
Gather the family around the table for these. They are fun to make together and special to keep for years.
17. Envelope Advent Calendar
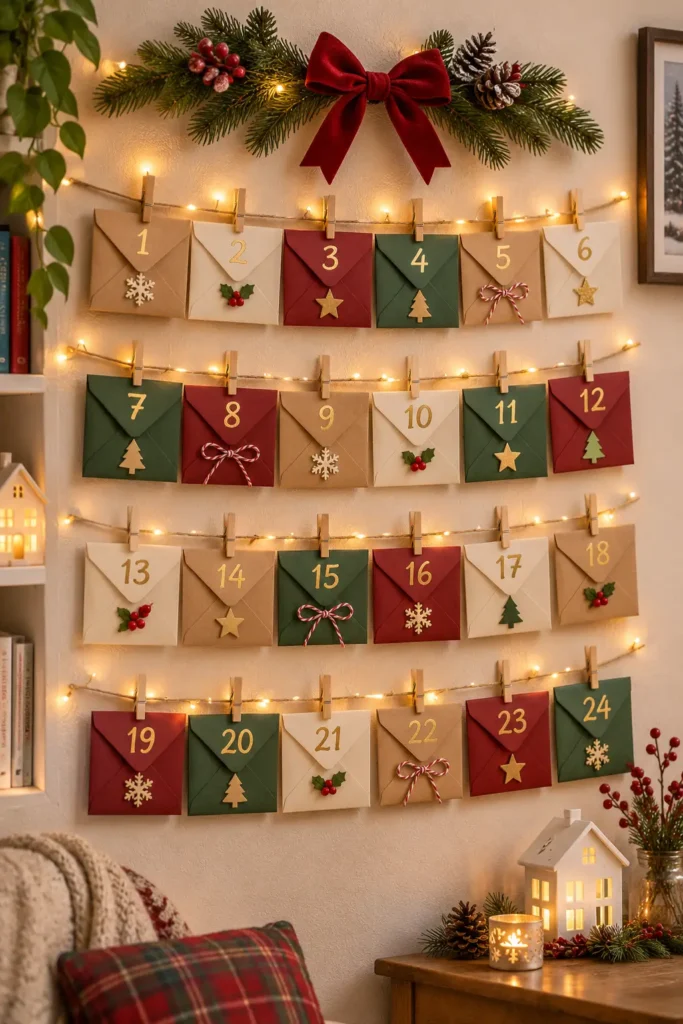
Count the days with twenty-four little envelopes. Write a number on each one with a gold pen. Slip in a small note, a sweet treat, or a fun task.
Clip the envelopes on a string with mini clothespins and hang it on a wall. Open one every morning in December. It builds joy in the family day by day.
Materials Needed:
- 24 small envelopes
- Gold pen
- Small notes or treats
- String
- Mini clothespins
- Removable hooks
How to Make It:
- Write numbers one to twenty-four on the envelopes.
- Slip a note or treat into each one.
- Hang a long string on the wall with hooks.
- Clip the envelopes on the string in order.
- Open one envelope each morning.
18. Pop-Up Christmas Cards
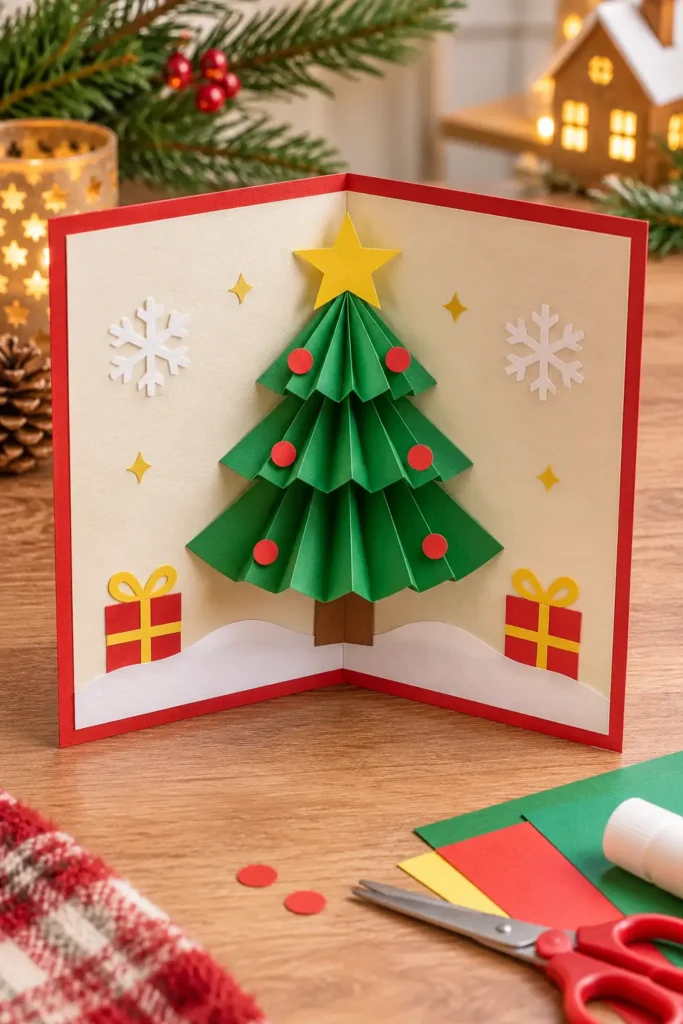
A pop-up card makes someone gasp when they open it. These paper Christmas decorations also work as sweet gifts. Fold a card in half.
Cut two short lines in the fold about two inches apart. Push the strip forward to make a step. Glue a paper tree on the step. Close the card, and the tree pops up when opened.
Materials Needed:
- Card paper
- Green paper
- Scissors
- Craft glue
- Ruler
- Gold pen
How to Make It:
- Fold a piece of card paper in half.
- Cut two short lines in the fold about two inches apart.
- Push the strip forward to make a step.
- Cut a tree from green paper.
- Glue the tree on the step.
- Close the card and open it to check the pop.
❄️ Want to Make This Winter and Christmas Extra Memorable?
19. Paper Plate Wreath
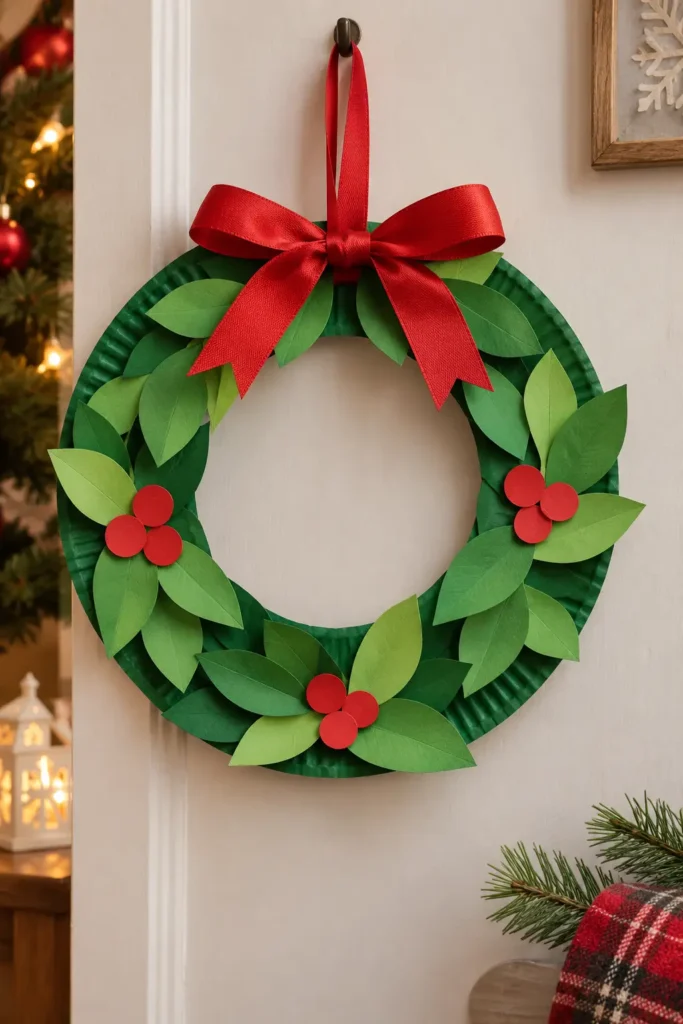
A paper plate gives you a free wreath base. Cut out the center of a plate and keep the rim. Paint it dark green.
Cut many small leaves from green paper and glue them in a ring,g overlapping each other. Add a few red paper dots as berries.
Tie a ribbon at the top. This is a fun project for kids and grown-ups to do together.
Order eco frienly paper plates here under budget: Click here
Materials Needed:
- Paper plate
- Green paint
- Green paper
- Red paper
- Craft glue
- Ribbon
How to Make It:
- Cut out the center of the plate.
- Paint the rim dark green and let it dry.
- Cut many small leaves from green paper.
- Glue the leaves around the rim in overlapping rows.
- Add red paper dots as berries.
- Tie a ribbon at the top.
20. Wallpaper Christmas Tree
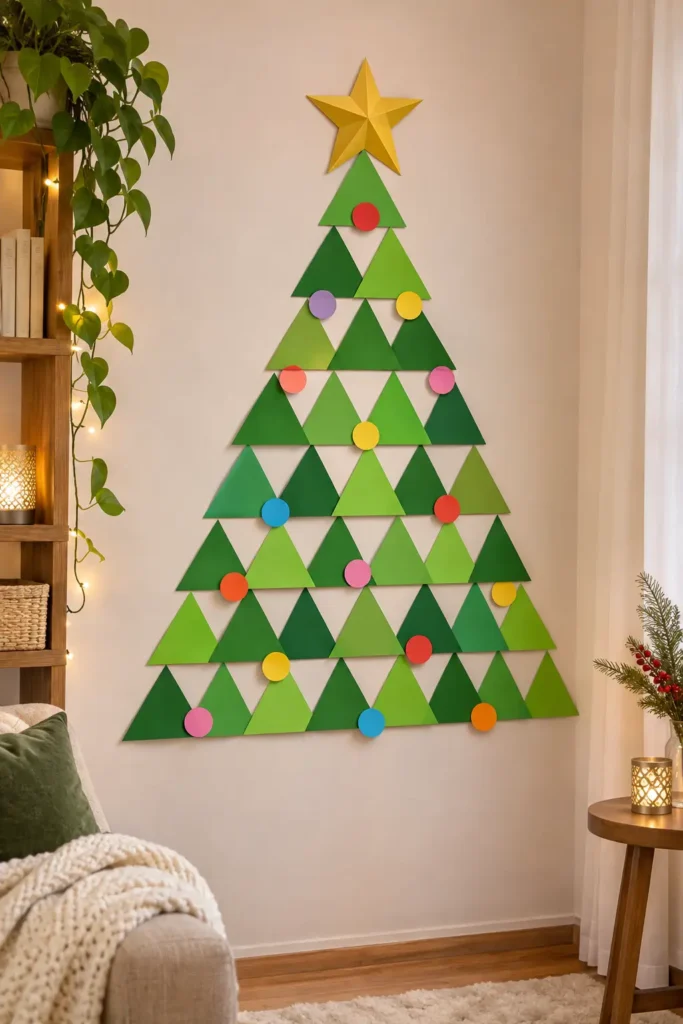
No space for a real tree? Make one on your wall. Cut about thirty triangles from green paper in three shades.
Tape the triangles in rows that grow wider toward the bottom. Use removable tape so your paint stays safe.
Add a gold paper star on top and stick on small paper circles as ornaments. Kids love placing the last piece.
Materials Needed:
- Green paper in three shades
- Gold paper
- Pencil
- Scissors
- Removable tape
How to Make It:
- Cut about thirty triangles from the green paper.
- Tape one triangle at the top of the wall.
- Add rows below that grow wider toward the bottom.
- Mix the three shades for depth.
- Tape a gold paper star on top.
- Stick small paper circles on the tree as ornaments.
Conclusion: Paper Christmas Decorations
You now have twenty simple ways to fill your home with Christmas cheer. Pick the ones that make you smile and start this weekend.
Play your favorite songs and invite a friend or your kids. Remember that paper Christmas decorations do not have to look perfect to feel special.
Every little fold carries a memory. I hope these paper Christmas decorations make your home warm and bright all season long. Enjoy every cut and every big laugh along the way.
FAQs About Paper Christmas Decorations
1. What are the easiest paper Christmas decorations to make for beginners?
Gingerbread chains, bunting banners, and tissue pom poms are the easiest. They need only simple cuts and glue. A beginner can finish one in under twenty minutes and still get a lovely result.
2. How can I make paper Christmas decorations last longer every year?
Use thick cardstock and store each piece flat in a dry box with tissue between layers. Keep them away from damp rooms and sunlight. Handle them gently when you put them up and take them down.
3. Are paper Christmas decorations safe to use near lights and candles?
Paper burns fast,t so never place it near real flames or hot bulbs. Use battery-powered LED lights and tea lights instead. Keep paper away from heaters and fireplaces, and check your lights often for heat.
🎄 Dreaming of a Magical Christmas Home and Celebration?
Explore beautiful Christmas decorations, creative DIY projects, cozy winter crafts, and budget-friendly wedding inspiration to make this holiday season unforgettable.
Follow Wavehooks on Pinterest for More Christmas Inspiration!


