

Last October, I picked up one dusty pine cone on a walk and brought it home in my pocket. It sat on my table for a week.
Then my daughter painted it white and called it a snow baby. We were hooked. Now I make DIY Christmas decorations using pine cones every year.
Below are some DIY Christmas decorations using pine cones, with clear, simple steps. First, read the leaf craft that stole my weekend, and then come back.
How to Prepare Pine Cones for Christmas Crafts
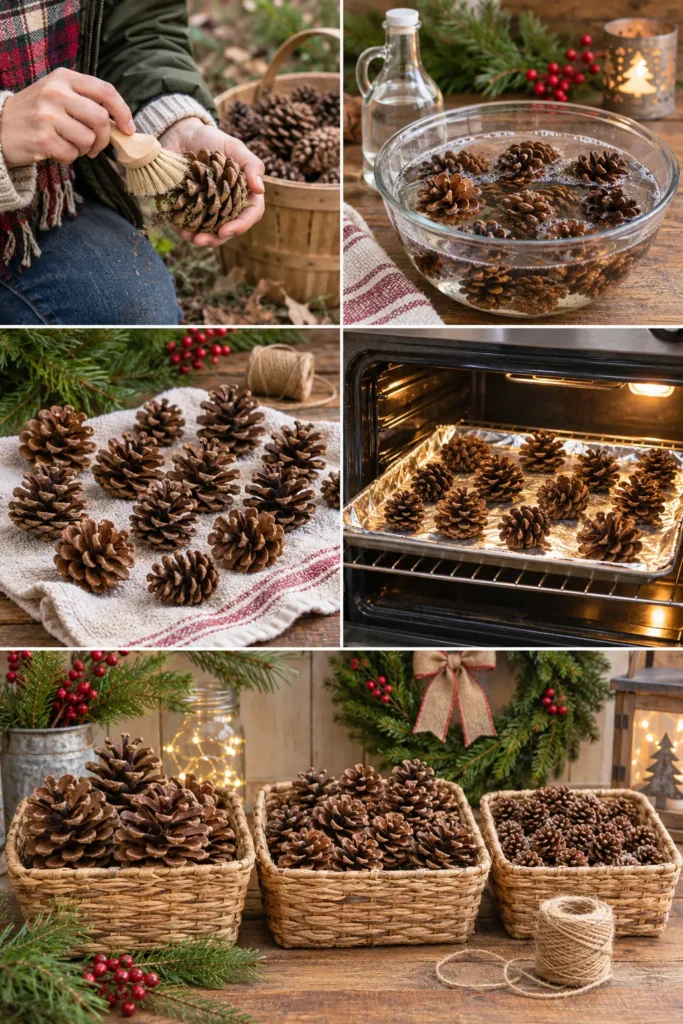
Before you start your DIY Christmas decorations using pine cones, take a moment to clean and prepare them properly.
This helps remove dirt, insects, and loose debris so your finished decorations look neat and last longer.
Step 1: Remove Dirt and Debris: Shake each pine cone outdoors to remove loose dirt, dry leaves, and small insects. Use a soft brush to clean between the scales.
Step 2: Wash the Pine Cones: Place the cones in a bowl of lukewarm water with a little white vinegar. Gently rinse them to remove remaining dirt. Avoid scrubbing too hard because the scales can be delicate.
Step 3: Dry Them Completely: Place the washed pine cones on an old towel and allow excess water to drain. Let them air-dry for several hours before baking.
Step 4: Bake to Open the Scales: Preheat your oven to 200°F (about 93°C). Arrange the pine cones in a single layer on a foil-lined baking tray. Heat them for approximately 30–60 minutes, checking regularly. This helps dry the cones and encourages their scales to open. Let them cool completely before handling.
Step 5: Sort and Store: Separate the pine cones by size. Keep small ones for ornaments and gift toppers and larger ones for wreaths and centerpieces. Store unused cones in a dry, breathable container until you need them.
Important Safety Tip: Only bake clean, untreated pine cones that are free from paint, glitter, or chemical coatings.
Never leave the oven unattended, keep cones away from heating elements, and follow the oven manufacturer’s safety instructions.
Some pine cones may contain resin, so stop heating if you notice smoke or a strong burning smell. Always let them cool completely before crafting.
Looking to buy pinecones under the budger: Grab this special deal of 50 pinecones!
Pine Cone Christmas Tree and Ornament Ideas
Natural touches make any tree shine. These four DIY Christmas decorations using pine cones look very cozy and truly handmade.
1. Mini Pine Cone Tree
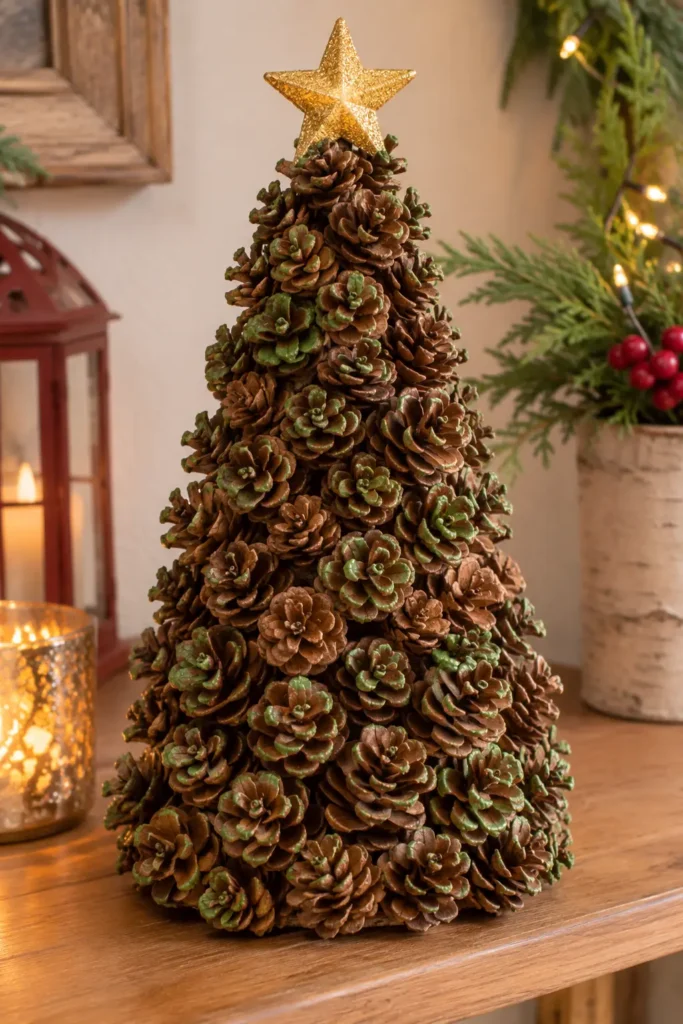
What You Need: One foam cone and a handful of small pine cones, plus hot glue, green paint, and a little gold ribbon.
How to Prepare: Brush off dirt from each cone and let them dry for a day. Paint the tips green if you like.
How to Make It: Start at the bottom of the foam cone and glue the pine cones in tight rows. Work up to the top and add a small star. Keep the cones close together so no foam shows.
Where to Display: Set it on a shelf or a bedside table. See the ribbon move that changes a tree into a fancy bow.
Safety Note: Hot glue can burn skin, so adults should handle the glue gun. Keep small pine cones, ribbon, and loose decorations away from toddlers and pets.
2. Snow-Tipped Pine Cone Ornaments
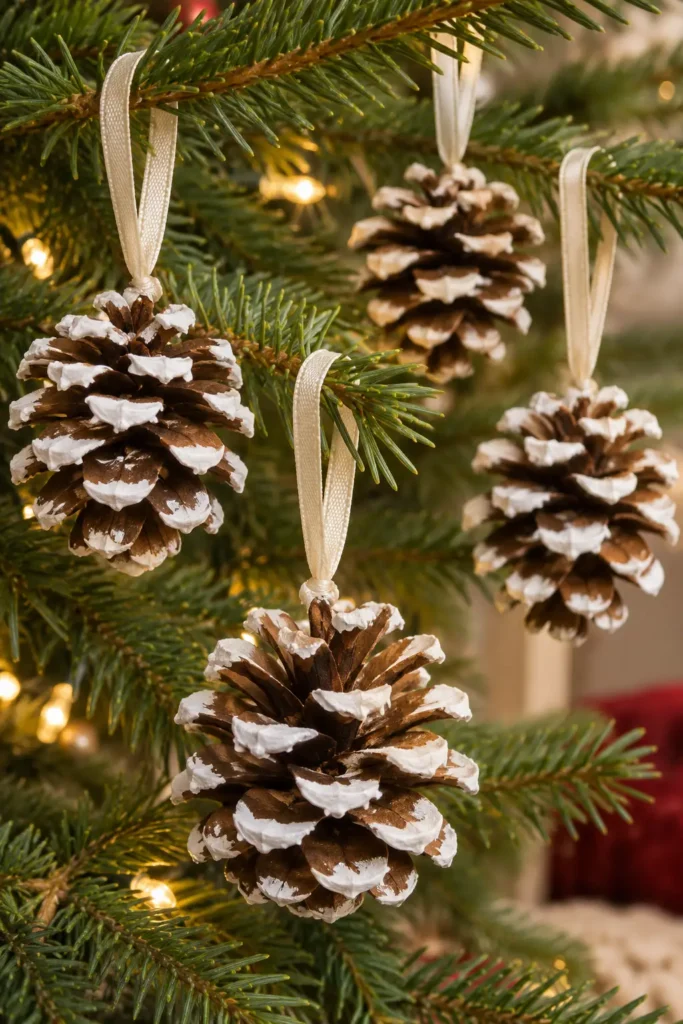
These DIY Christmas decorations using pine cones look like they walked out of a snowy forest.
What You Need: Small pine cones, white paint, a flat brush, thin ribbon, and hot glue.
How to Prepare: Bake the cones on a foil tray at 200 degrees Fahrenheit for thirty minutes so they open wide and lose bugs. Ask an adult to handle the hot tray.
How to Make It: Dab white paint on each tip and let it dry. Glue a ribbon loop at the top. Two coats of paint look the best. Stay patient because wet paint smudges easily.
Where to Display: Hang them on your tree or tie them to gift boxes.
Safety Note: Use an oven-safe tray and let the cones cool completely before painting. Work in a ventilated area and keep hot glue and wet paint away from children.
3. Pine Cone Garland for Stairs
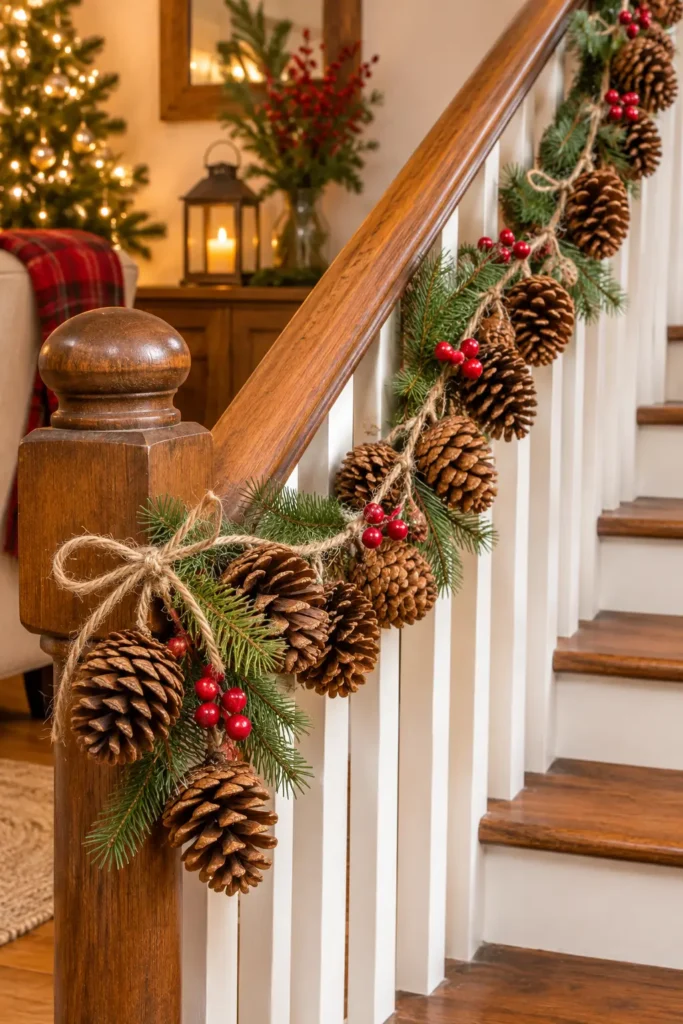
Want a garland that smells like a forest walk? This is one of my favorite DIY Christmas decorations using pine cones.
What You Need: Twenty pine cones, strong twine, thin wire, and scissors.
How to Prepare: Wash cones in cold water and then bake at low heat for an hour until they open again.
How to Make It: Wrap a piece of wire around the base of each cone and twist it tight. Tie each wire to the twine with equal gaps. Make the garland longer by adding more cones later. Tuck in a few red berries for color. Keep it away from open flames.
Where to Display: Drape it along the banister and check the staircase everyone ignores.
Safety Note: Use scissors and wire carefully to avoid cuts. Secure the garland firmly so it cannot fall, and keep it away from stairways where people might catch their feet or hands.
Grab a special deal of 50 pine cones here to get under budget: Best deal ever
4. Gold-Dipped Pine Cone Ornaments
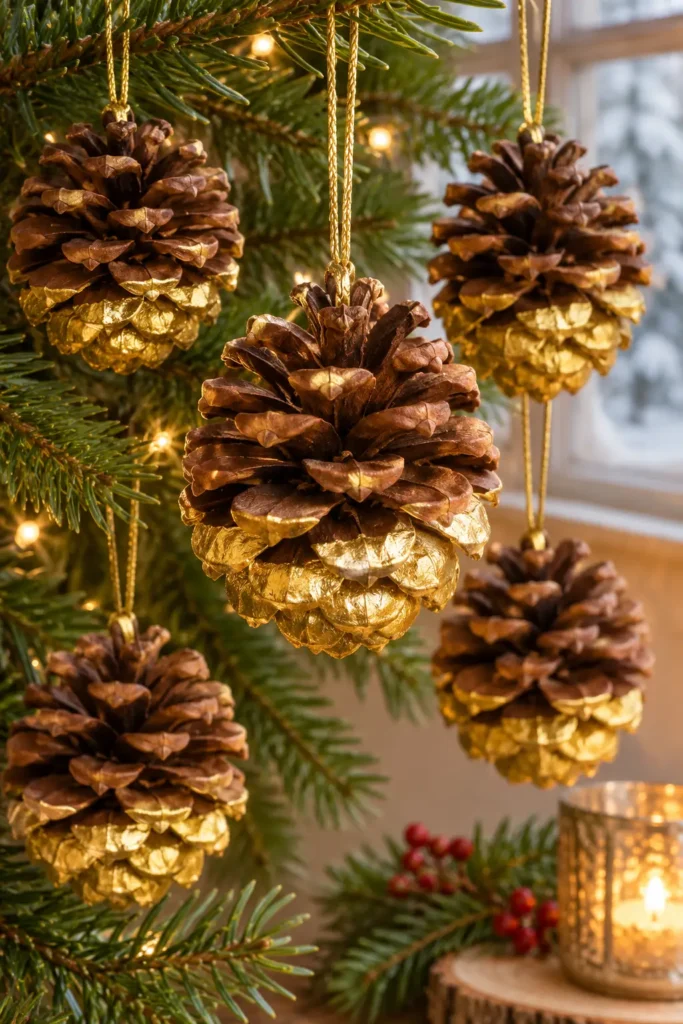
Gold-dipped cones look so rich for so little money.
What You Need: Medium pine cones, gold acrylic paint, a paper cup, and thin gold string.
How to Prepare: Brush each cone and bake it at low heat so it opens fully.
How to Make It: Hold the cone by the top and dip just the bottom half into paint. Let the extra drip off. Stand it up to dry on wax paper. Tie string around the top. Dipping looks best when you leave the top natural. Wear old clothes to stay clean.
Where to Display: Hang them in a window or place them in a clear bowl. Mix gold and silver for a fun and shiny set.
Safety Note: Use acrylic paint in a well-ventilated space and avoid getting it in your eyes or mouth. Let the paint dry completely before hanging the ornaments.
🌲 More Creative DIY Christmas Decorating Ideas
Pine Cone Wreath and Door Decor Ideas
Your front door sets the mood. These four DIY Christmas decorations using pine cones give guests a big warm hello.
5. Classic Pine Cone Wreath
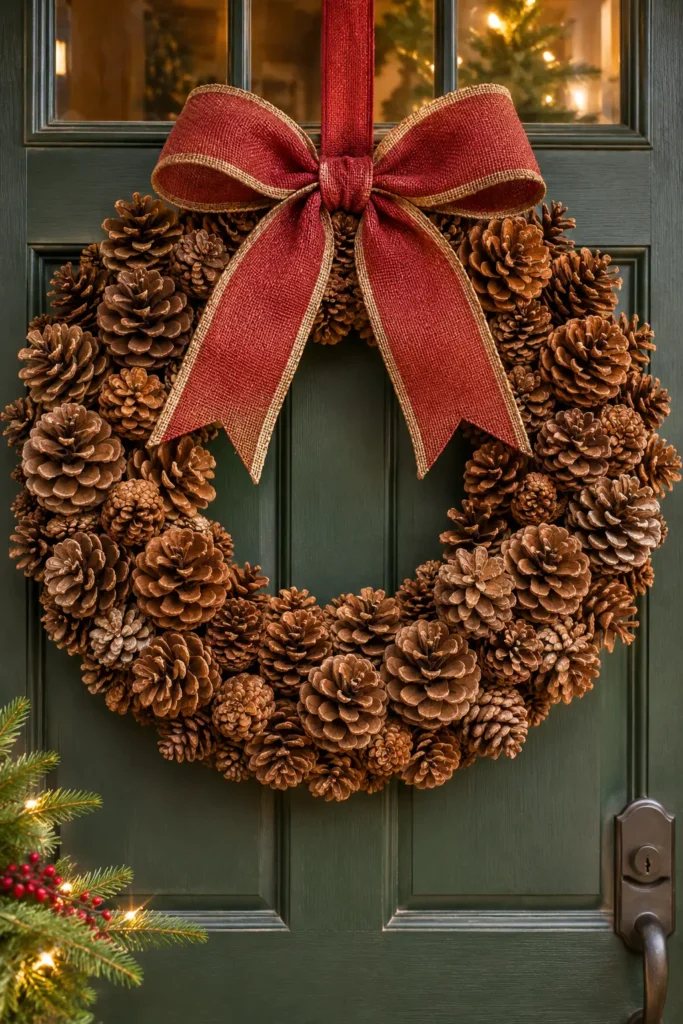
A pine cone wreath welcomes everyone to your door. It is one of the easiest DIY Christmas decorations using pine cones.
What You Need: A foam wreath form, forty pine cones, hot glue, and a wide ribbon.
How to Prepare: Clean the cones and bake them at low heat until open.
How to Make It: Start gluing cones on the outer edge and then the inner edge. Fill the middle rows last. Press each cone firmly for ten seconds until the glue holds. Use big cones first and small cones for gaps. Add a ribbon bow at the top.
Where to Display: Hang it on your front door. See the fake wreath trick guests miss for extra ideas.
Safety Note: Handle hot glue carefully and allow the wreath to cool before hanging. Use a strong hook and check that the wreath is secure so it cannot fall on anyone.
Grab your christmas wreath under budget and grab this up with special offer today!
6. Pine Cone Rosette Wreath
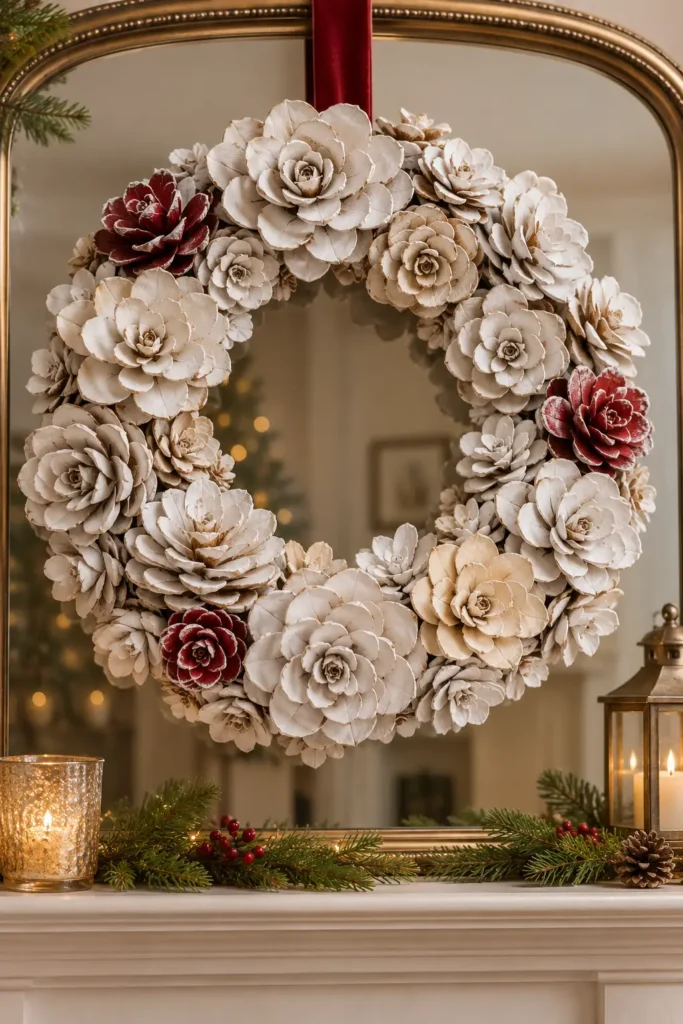
Cut a pine cone in half so it looks like a wooden flower.
What You Need: Pine cones, garden clippers, a wire wreath form, hot glue, and white paint.
How to Prepare: Bake the cones until open, and ask an adult to cut them across the middle with strong clippers. Work slowly because clippers can slip.
How to Make It: Paint the cut faces white. Glue the flowers flat onto the wreath form in tight rings. Make extra flowers for gift toppers.
Where to Display: Hang it over a mirror or lean it on a mantel. Rosettes look pretty in plain white or soft cream. Paint a few flowers red for a pop of color.
Safety Note: Only adults should use sharp garden clippers. Wear protective gloves while cutting pine cones, and keep the clippers away from children.
7. Mini Pine Cone Wreath Gift
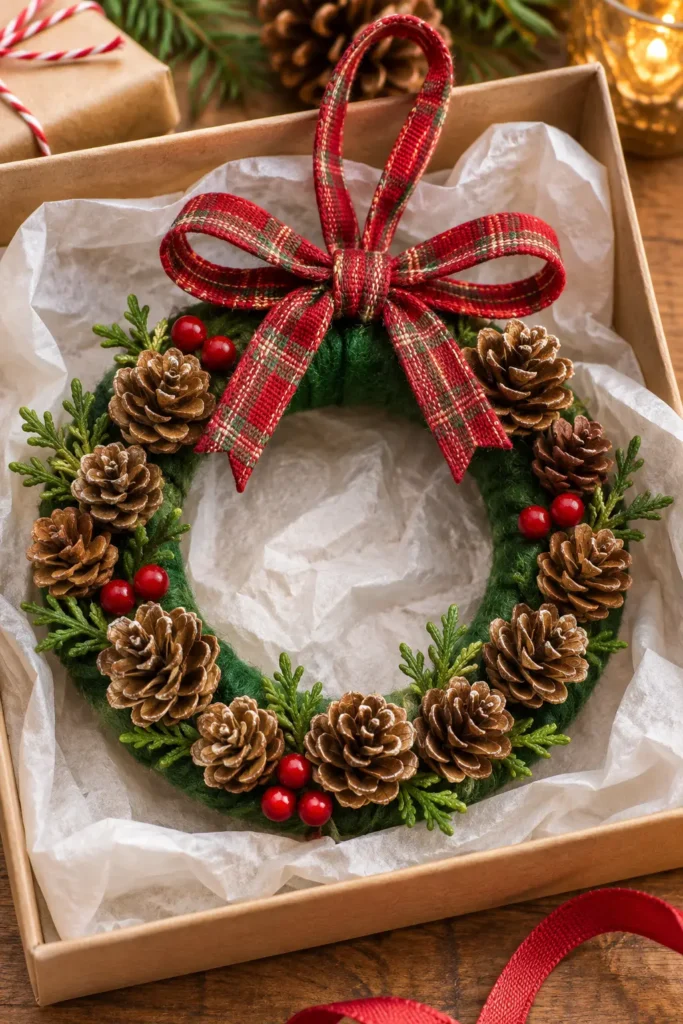
Small wreaths make sweet gifts. Among my favorite DIY Christmas decorations using pine cones, this one suits teachers and neighbors.
What You Need: A small wire ring, tiny pine cones, green felt, glue, and ribbon.
How to Prepare: Pick the smallest cones and let them dry.
How to Make It: Glue felt around the ring first. Add cones around it. Tie a ribbon loop at the top. Add a small tag with a kind message. Wrap it in tissue paper and tuck it in a small box. Make five in one evening.
Where to Display: Hang it on a cabinet knob or a tree. Looking for gifts? Read a note that made a teacher tear up.
Safety Note: Cover sharp wire ends so they cannot scratch anyone. Adults should handle hot glue, and make sure small decorations are firmly attached before giving the wreath to children.
Grab the red christmas ribbon for the best price under $2 to make it look too realistic!
8. Pine Cone Door Swag
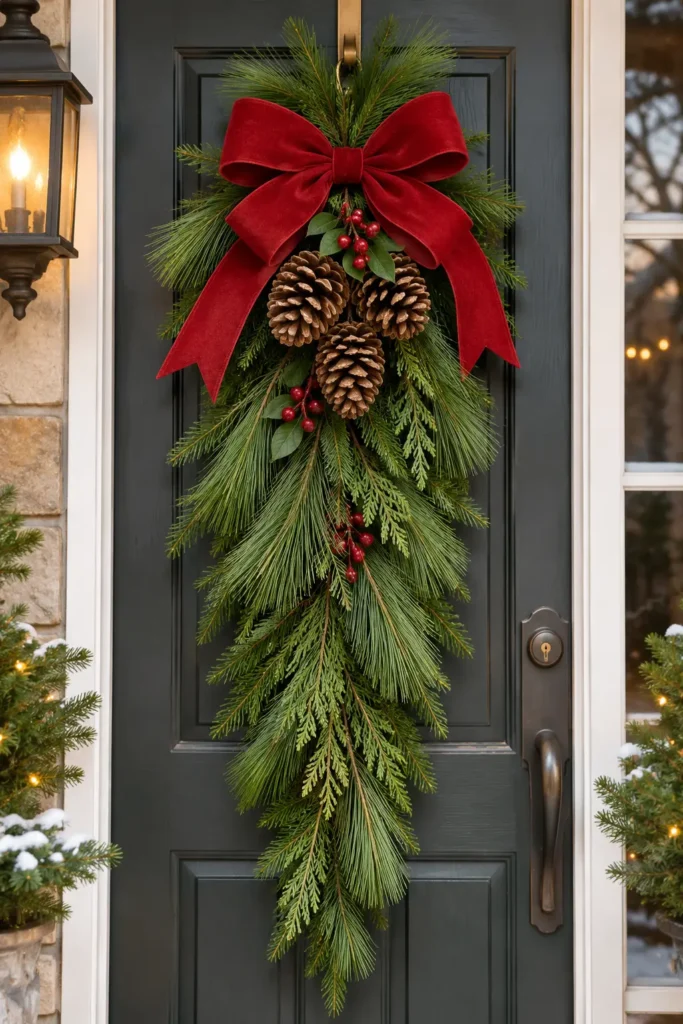
A swag is a wreath that hangs long and loose. Try this one among your DIY Christmas decorations using pine cones if your door is narrow.
What You Need: A few pine branches, ten pine cones, floral wire, and a red bow.
How to Prepare: Shake the branches outside and wipe the cones.
How to Make It: Lay the branches in a fan shape and wire them together at the center. Wire the cones on top in a cluster. Attach the bow. Add a pinch of glitter on the bow for sparkle. Spray a little clear sealer so the cones stay shiny.
Where to Display: Hang it with a strong hook at the top of the door.
Safety Note: Floral wire can have sharp ends, so wear gloves while assembling the swag. Use spray sealer outdoors or in a well-ventilated area and keep it away from flames.
Pine Cone Centerpiece and Table Decor Ideas
Good food needs a pretty table. These four DIY Christmas decorations using pine cones will make dinner feel very special.
9. Pine Cone Candle Centerpiece
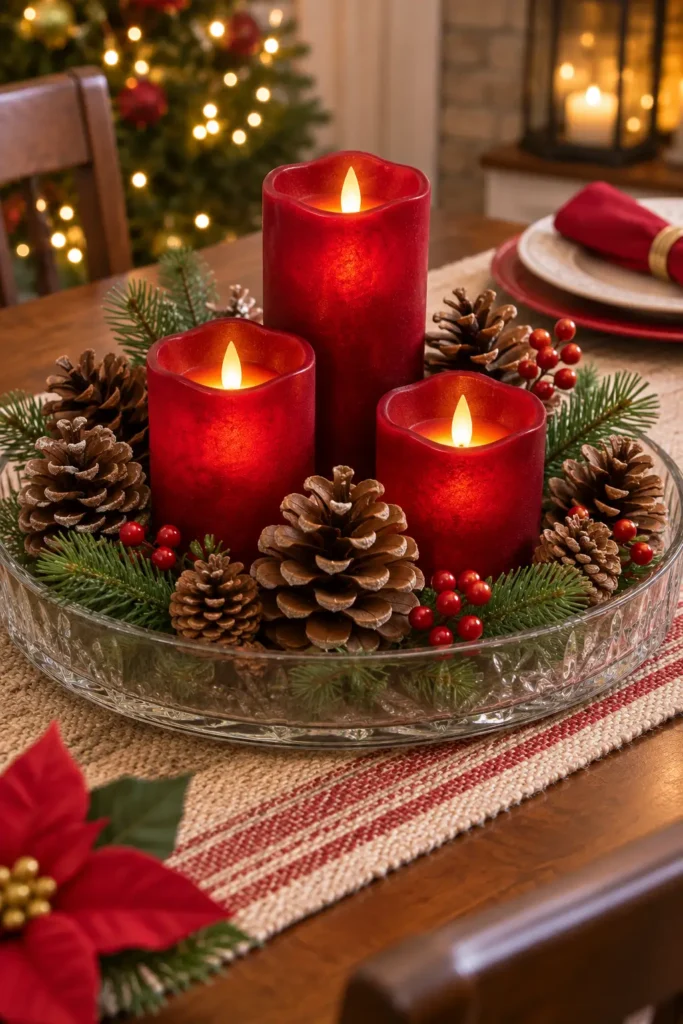
Candles and cones make a table glow.
What You Need: A wide glass tray, three battery-powered pillar candles in deep red, a bowl of pine cones, and a few dried berries.
How to Prepare: Dust the cones with a soft brush and let them sit in a warm room.
How to Make It: Place the candles in the middle of the tray. Pile cones around them and tuck in berries. Cones glow nicely in candlelight.
Where to Display: Set it on your dining table or coffee table. For rich color, see the wine red style pros love. Use battery candles near the cones for safety. Swap in fresh pine sprigs every few days to keep it green.
Safety Note: Use battery-operated candles instead of real flames because dry pine cones and greenery can catch fire. Keep small berries and decorations away from young children and pets.
Here are the best candle offers you can avail: Active till this weekend!
10. Pine Cone Place Card Holders
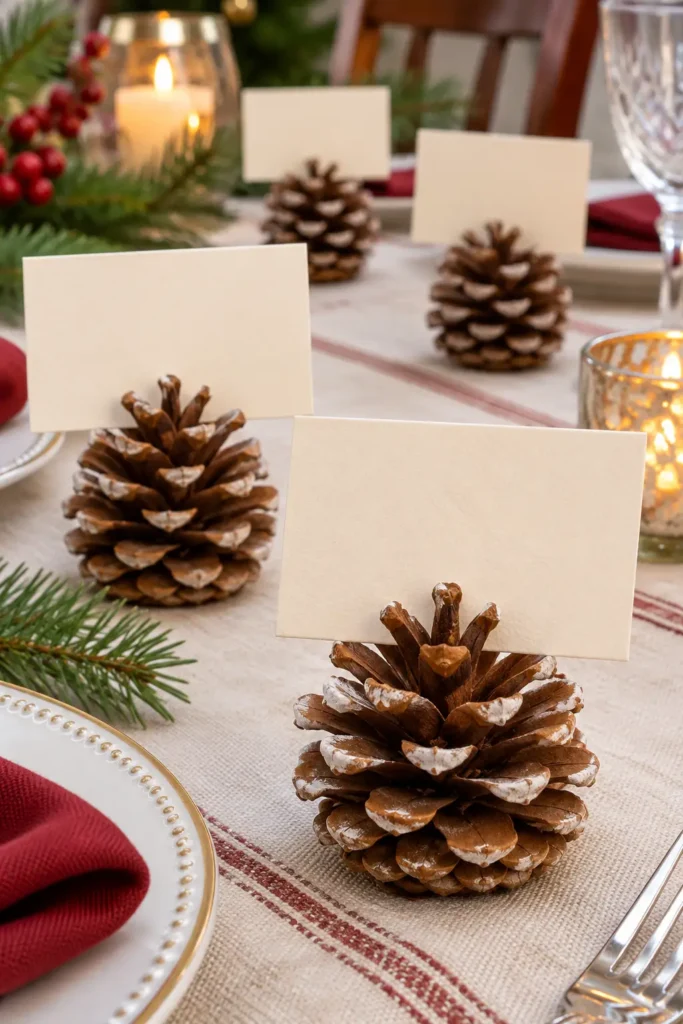
Name cards feel special when pine cones hold them. This is one of my cutest DIY Christmas decorations using pine cones for dinner parties.
What You Need: Small pine cones, paper, a pen, and a little glue.
How to Prepare: Choose cones with a flat bottom so they stand.
How to Make It: Cut paper into small cards and write each name. Push the card between two scales near the top of the cone. Add a dot of glue if it slips. Use gold ink for a fancy touch. Kids can write the names for you.
Where to Display: Set one at every plate. Guests often take them home. Try different cone sizes for a playful table.
Safety Note: Adults should handle scissors and any hot glue. Make sure the pine cones are clean and dry before placing them near food or dinner plates.
❄️ More Handmade Winter Decorating Inspiration
11. Pine Cone Napkin Rings
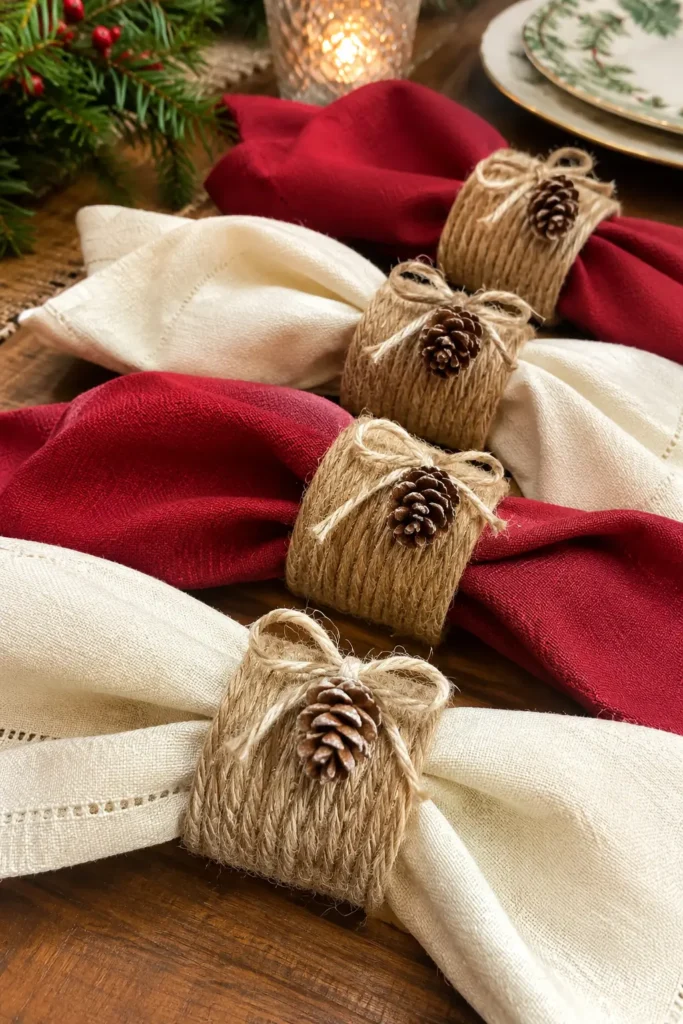
Napkin rings add a rustic touch for almost no money.
What You Need: Cardboard tubes, tiny pine cones, twine, and hot glue.
How to Prepare: Cut a tube into rings about as wide as two fingers. Toilet paper tubes work great.
How to Make It: Wrap each ring in twine and glue the ends. Glue one tiny cone and a small bow on the front. Hot glue sets fast, so place the pieces carefully. Let it dry for ten minutes. Pick cones of the same size so the set looks neat.
Where to Display: Slide a folded napkin through each ring. Pair them with paper decor worth every minute.
Safety Note: Use clean cardboard tubes and keep hot glue away from children’s hands. Check that the pine cone and twine are firmly attached before using the napkin rings.
Here are the best napkins your guests will get surprised too!
12. Pine Cone Lantern Jar Filler
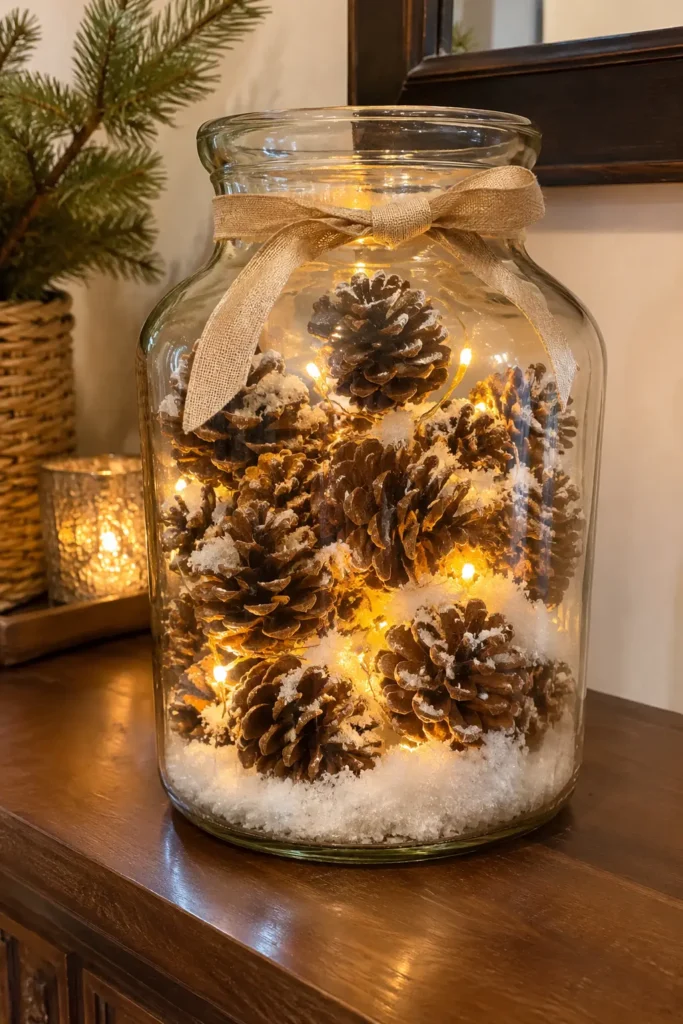
Fill a glass jar with cones and watch it shine. Few DIY Christmas decorations using pine cones need less work than this.
What You Need: A big glass jar or lantern, small pine cones, a string of battery lights, and fake snow.
How to Prepare: Wipe the jar clean and dry the cones.
How to Make It: Drop the light string into the jar. Pack cones around it and sprinkle a little fake snow. Use a jar with a wide mouth so your hand fits. Add a ribbon around the neck of the jar.
Where to Display: Put it by the front door or on a hearth. Switch it on at dusk. It also makes a lovely gift.
Safety Note: Use only battery-operated lights and check that the light string is suitable for enclosed decorations. Avoid damaged wires, keep the jar away from water, and use a stable surface where it cannot tip over.
How to deal with the vintage glass crafts for this christmas party check this out!
Easy Pine Cone Crafts for Kids
Little hands love messy fun. These four DIY Christmas decorations using pine cones are easy and fun for young kids.
13. Pine Cone Reindeer
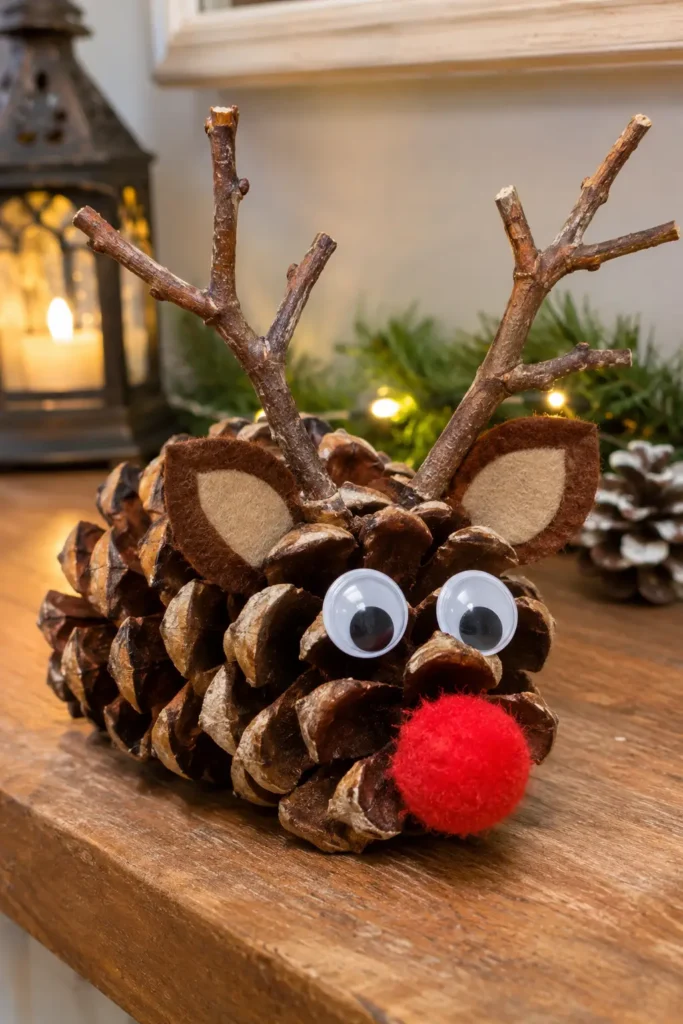
Kids will laugh when they see this funny reindeer.
What You Need: One pine cone, two small twigs, two googly eyes, one red pom-pom, and craft glue.
How to Prepare: Choose a cone and brush off the dust.
How to Make It: Lay the cone on its side and glue the red pom-pom at the pointed end for the nose. Stick on the eyes above it. Draw a small mouth for extra personality. Push two twigs into the scales on top for antlers. Give each one a name.
Where to Display: Line the reindeer along a shelf. Kids will love a handprint craft that melts hearts next.
Safety Note: Choose child-safe craft glue and supervise children while using small decorations. Check that googly eyes, pom poms, and twigs are securely attached to prevent choking hazards.
14. Pine Cone Snowman
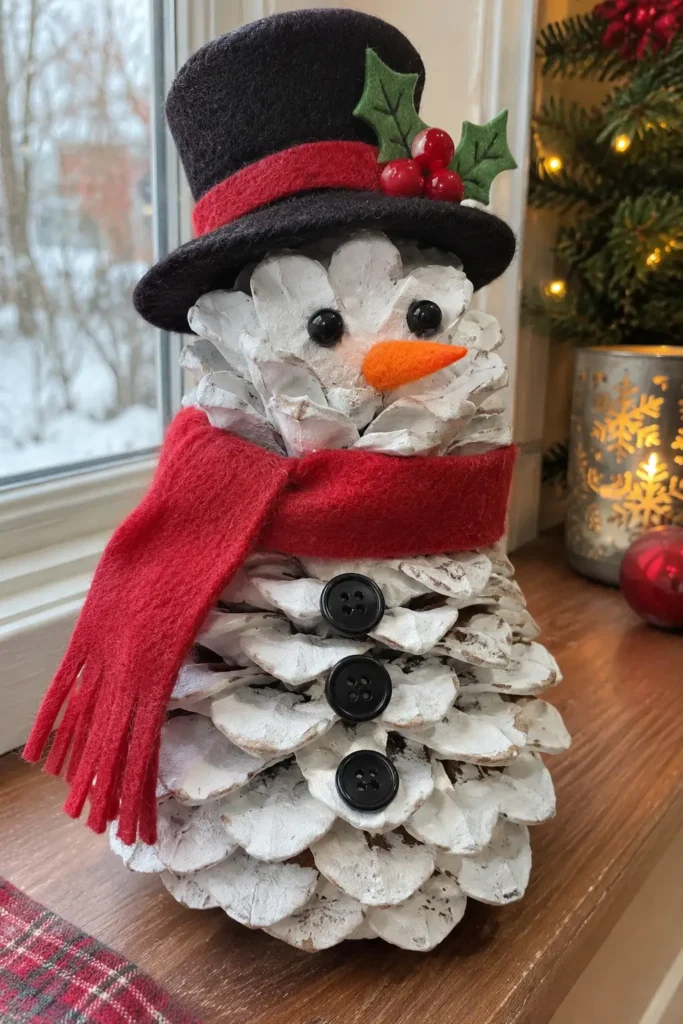
This chubby snowman is a winner among DIY Christmas decorations using pine cones.
What You Need: One big pine cone, white paint, a bit of felt, a small orange bead, and a black marker.
How to Prepare: Bake the cone until it opens, and let it cool.
How to Make It: Paint the whole cone white and let it dry. Dry the paint fully before gluing. Glue a felt scarf around the middle. Press the orange bead at the front for a nose. Draw eyes with the marker. Add small buttons down the front for fun.
Where to Display: Stand it on a windowsill or a desk. Make three in different sizes for a snow family.
Safety Note: Adults should handle the oven and hot glue gun. Use non-toxic, child-safe paint and keep beads and small buttons away from toddlers.
Also Read: winter crafts to try this weekend which can add ultimate fun!
15. Peanut Butter Bird Feeder
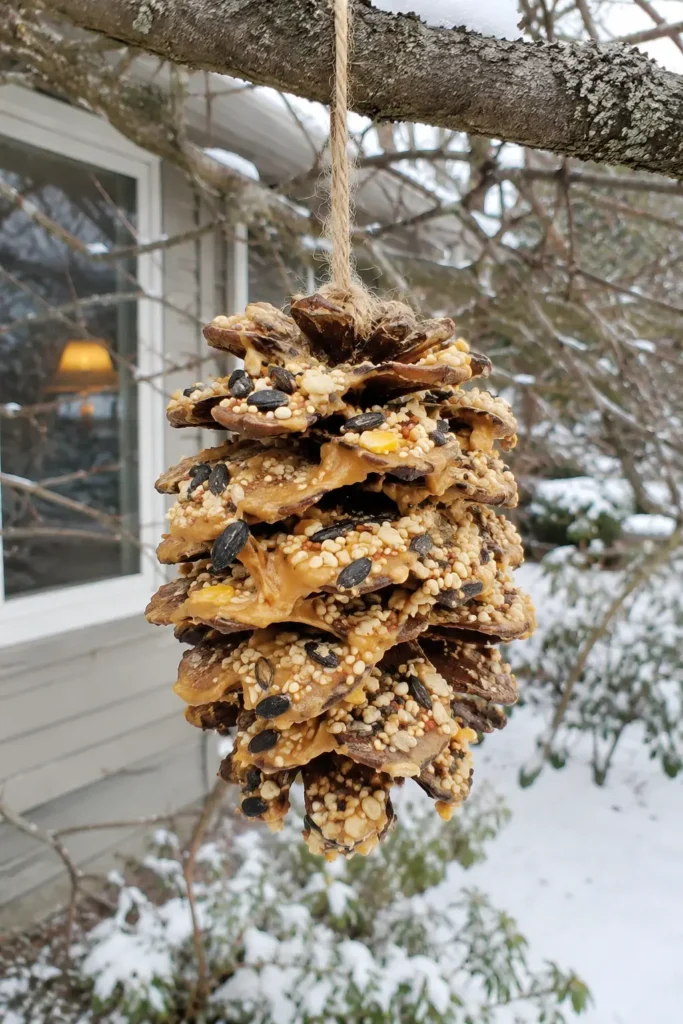
Share the holiday joy with birds outside. Here is one of my kindest DIY Christmas decorations using pine cones.
What You Need: A large pine cone, peanut butter, birdseed, and string.
How to Prepare: Tie a long string around the top of the cone.
How to Make It: Spread peanut butter over the scales with a spoon. Roll the cone in birdseed on a plate. Press the seeds in with your hands. Use sunflower butter if you prefer.
Where to Display: Hang it from a tree branch. Learn what fall leaves can secretly do in your garden too. Place it where cats cannot reach. Birds love it in cold weather. Replace the feeder when the birds finish it.
Safety Note: Check whether peanut butter is safe for the birds and avoid products containing xylitol or other unsuitable additives. Wash hands after handling birdseed and peanut butter, and keep the feeder away from areas where pets can reach it.
For regular bird feeder here are the deals you can get under best budget
16. Pine Cone Angel
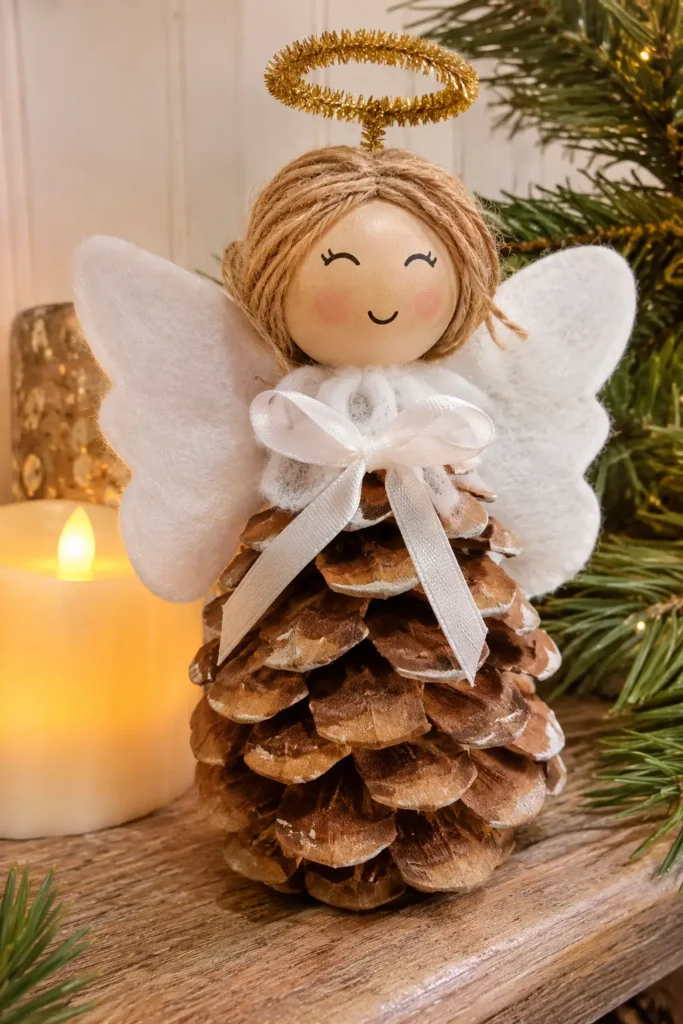
A little angel can watch over your tree.
What You Need: One pine cone, a wooden bead, white felt, gold pipe cleaner, and glue.
How to Prepare: Pick a cone with a neat shape and dust it off.
How to Make It: Glue the wooden bead to the pointed end for the head. Cut two felt wings and glue them on the back. Choose white felt for a soft, glowing look. Bend the gold pipe cleaner into a halo and glue it on top. Draw a small smile.
Where to Display: Tuck it into the tree or set it by a candle. Use a battery candle for safety. Make one for each grandparent.
Safety Note: Adults should handle hot glue and scissors. Bend and cover any sharp pipe-cleaner ends, and keep small beads away from young children.
🎄 More Festive DIY Projects to Try This Christmas
Pine Cone Gifts and Home Decor Ideas
Pine cones also make lovely gifts and home touches. These four DIY Christmas decorations using pine cones share the love.
17. Pine Cone Gift Toppers
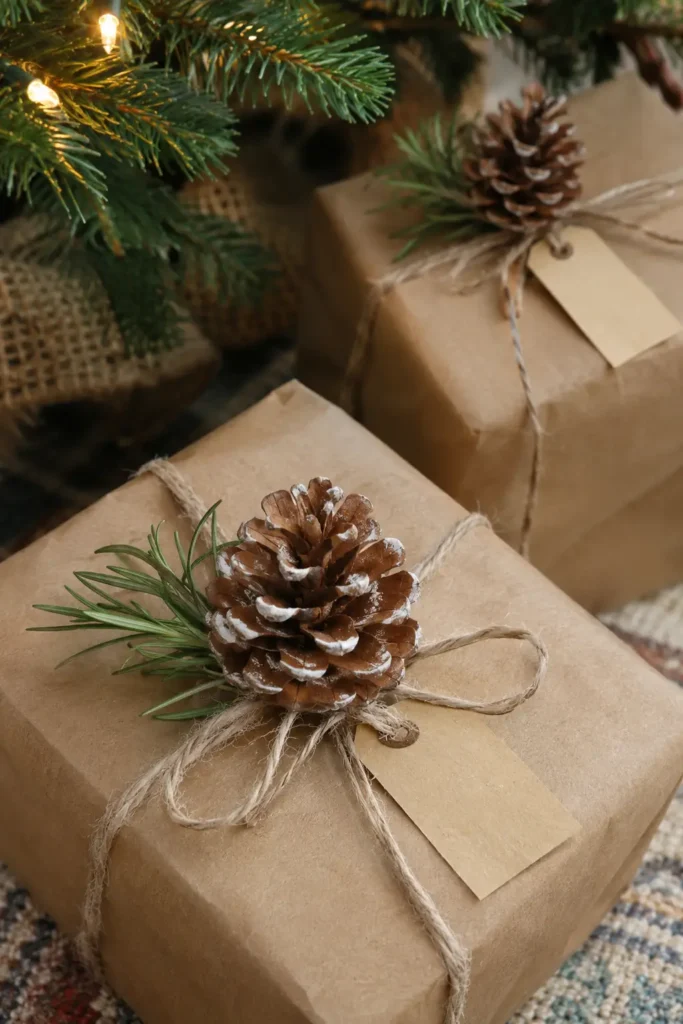
Plain gift wrap turns fancy with a single cone. Many DIY Christmas decorations using pine cones double as gift toppers.
What You Need: Small pine cones, brown paper, twine, and a pencil.
How to Prepare: Dust the cones and pick ones with a flat bottom.
How to Make It: Wrap the gift in brown paper. Tie twine around it twice. Glue a cone on top of the knot. Mix in a sprig of rosemary for a lovely smell. Write a name on a tiny tag and hang it from the cone.
Where to Display: Stack the gifts under the tree. Peek at why one small basket makes adults cry. Cones are free when you collect them.
Safety Note: Make sure the pine cone and other decorations are firmly attached so they do not fall off. Keep small gift toppers, string, and loose decorations away from babies and pets.
Get the best gift wrappers to surprise your loved ones here!
18. Cinnamon Scented Pine Cones
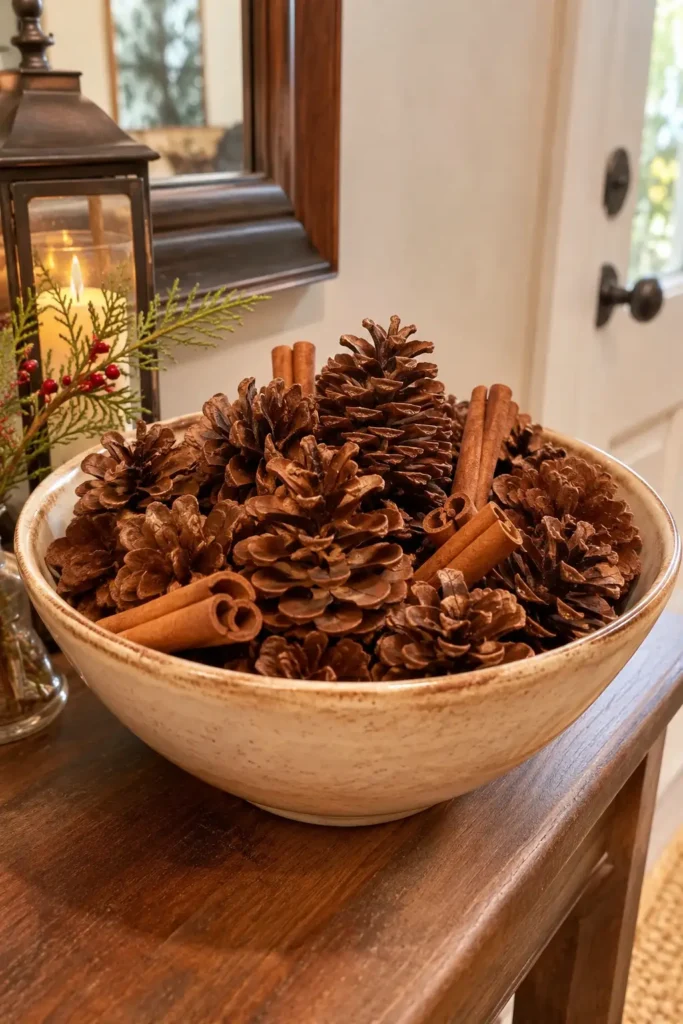
Smell is half the magic of the holidays. These DIY Christmas decorations using pine cones fill a room with a warm scent.
What You Need: Pine cones, cinnamon essential oil, a zip bag, a bowl, and a few cinnamon sticks.
How to Prepare: Bake the cones until open and cool them well.
How to Make It: Place the cones in the bag. Add ten drops of oil and shake gently. Leave them sealed for two days. Turn the bag gently once a day while they rest.
Where to Display: Pile them in a bowl with cinnamon sticks near the entry. Refresh with two drops each week. Keep oils away from pets and small kids.
Safety Note: Essential oils can irritate skin and may be harmful if swallowed or exposed to pets. Keep scented cones out of children’s reach, avoid direct skin contact, and use them in a well-ventilated room.
Don’t throw away your used cinnamon, use them to keep the mice away here!
19. Pine Cone Mantel Display
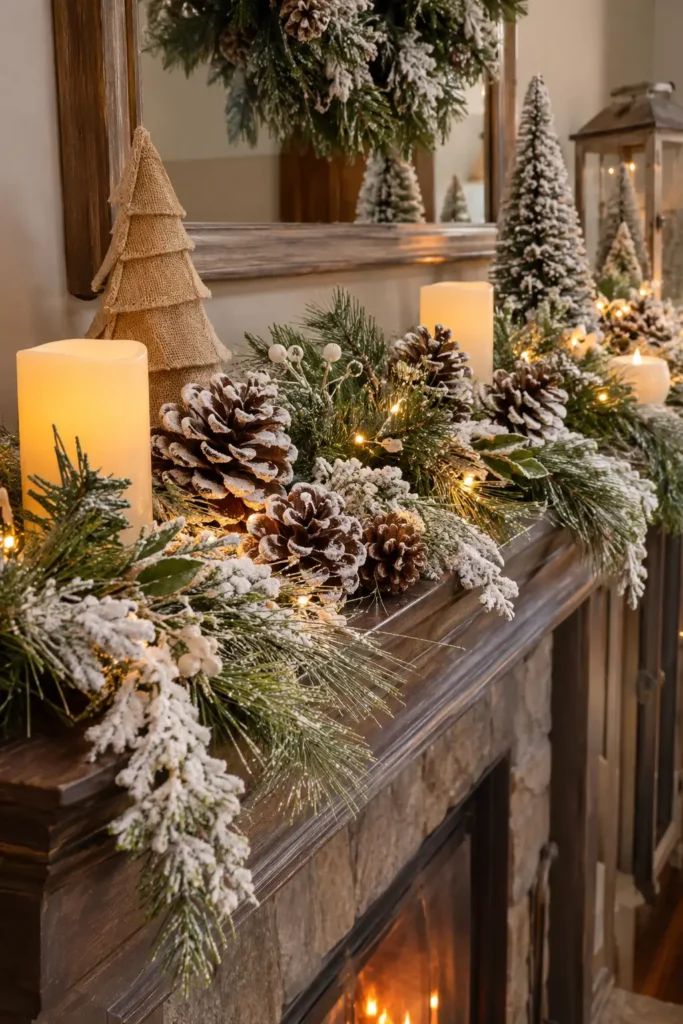
Your mantel can look like a snowy forest.
What You Need: Lots of pine cones, white paint, fairy lights, and a long runner of faux greenery.
How to Prepare: Dry-brush a little white paint on the tips of the cones.
How to Make It: Lay the greenery along the mantel. Weave the lights through it. Tuck cones in groups of three. Fill gaps with small cones. Lights hide behind the cones. Odd numbers look natural and calm.
Where to Display: Add candles at each end and step back to check the balance. Borrow more style from decor that looks so luxurious. Use battery candles near greenery. Dust the cones lightly each week to keep them fresh.
Safety Note: Choose battery-operated candles and lights to reduce fire risks. Keep wires tidy, avoid overloading electrical outlets, and secure decorations so nothing can fall from the mantel.
20. Pine Cone Photo Holders
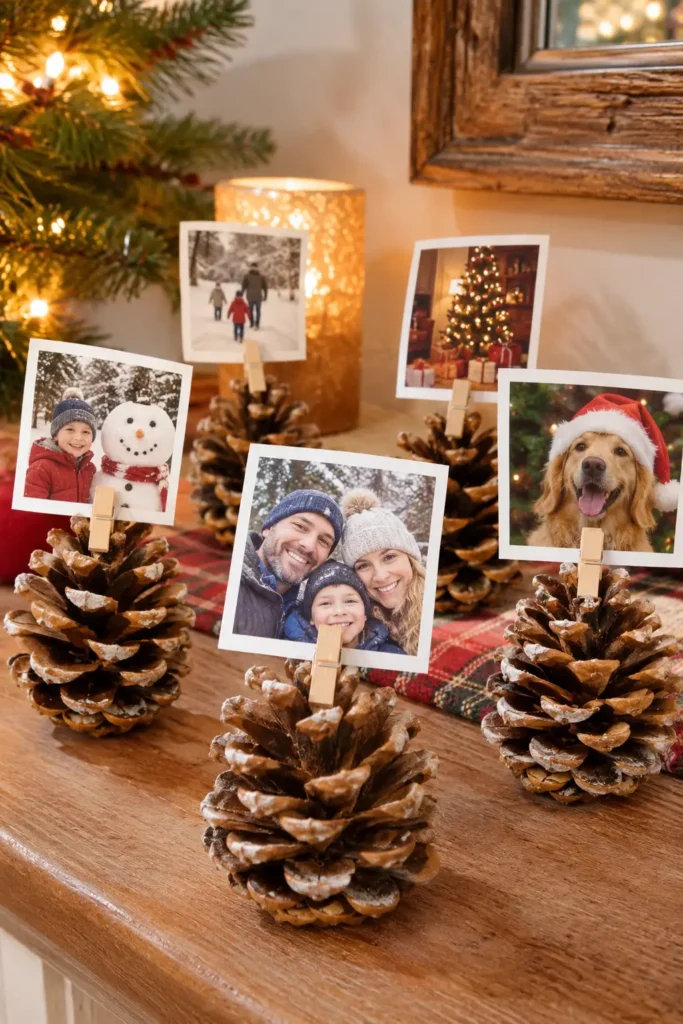
Memories belong on display at Christmas. Here is a sweet entry among DIY Christmas decorations using pine cones.
What You Need: Medium pine cones and a mini clothespin or a small clip, gold spray paint, and a few photos.
How to Prepare: Spray the cones outside on newspaper and let them dry.
How to Make It: Glue a clothespin to the top of each cone. Let the glue set for ten minutes. Clip a small photo into each one. Print photos small, so the clips hold them.
Where to Display: Line them on a shelf or hang a cluster from a branch. Switch photos every year. Pick photos of loved ones near and far.
Safety Note: Use spray paint outdoors and follow the product instructions. Adults should handle spray paint and hot glue. Allow the cones to dry completely before bringing them indoors.
For better photo holders under budget to gift check this out!
Conclusion: DIY Christmas Decorations Using Pine Cones
You now have 20 ways to turn simple cones into holiday magic. Pick one project and start this weekend.
Gather a basket of cones on your next walk and let them dry. Share your finished pieces with someone you love.
These DIY Christmas decorations using pine cones cost little and bring big smiles.
Make hot cocoa and try the snacks that steal the show on craft night while you glue. Happy crafting and a very Merry Christmas to you and your lovely family!
FAQs About DIY Christmas Decorations Using Pine Cones
1. How do I clean pine cones before making DIY Christmas decorations using pine cones?
Wash them in cold water or soak them in a vinegar and water mix for twenty minutes. Dry them, then bake on foil at low heat for one hour until they open. This helps remove bugs.
2. Which glue works best for sticking pine cones together?
Hot glue works best because it grips fast and holds the rough scales. Use craft glue for lighter pieces and kids’ crafts. Hold each piece firmly for ten seconds. Ask an adult to use the hot glue gun.
3. How long do pine cone decorations last and how do I store them for next year?
Painted and sealed cones last for many years. Store them in a dry box with tissue paper. These DIY Christmas decorations using pine cones stay fresh when kept away from damp rooms. Check them each November.
🌲 Love These Pine Cone Christmas Decorations?
Find More Easy DIY Christmas Ideas!
Follow Wavehooks on Pinterest for More DIY Christmas Inspiration!


